First and foremost, Lightspeed is a powerful and expansive system in the world of POS and eCommerce. It offers specialized solutions tailored to meet the needs of both online businesses and local retail stores. Compared to WooCommerce, Lightspeed operates on a much larger scale. However, WooCommerce has its own unique advantages that make it one of the most popular eCommerce platforms globally – its open-source nature, high customizability, and seamless integration with the industry-leading content management system, WordPress.
Migrating your online store from Lightspeed to WooCommerce can open up a world of flexibility, powerful content management, and enhanced SEO capabilities. However, moving your data, including products, orders, customers, SEO settings, and more – requires careful planning to ensure a smooth transition.
With Next-Cart’s Lightspeed to WooCommerce migration tool, you can automate the migration process, saving time and minimizing errors. In this guide, we’ll walk you through everything you need to know, from understanding key data structure differences to optimizing your new WooCommerce store after migration. Whether you’re using Lightspeed’s integrated Retail POS and eCom or just its eCommerce features, this step-by-step approach will help you transition seamlessly while keeping your data intact.
- Retail POS and eCommerce
- Understanding the Differences in Data Structure
- Migrating from Lightspeed to WooCommerce with Next-Cart
- Post-Migration Adjustments
- 1. Verify and organize data
- 2. Configure WooCommerce features
- 3. Test and optimize your store
- 4. Integrate POS systems (if applicable)
- Final Thoughts
Retail POS and eCommerce
Lightspeed stands out by offering robust solutions for both physical stores and online businesses. Its Retail POS system streamlines in-store sales and inventory management, while its eCom module handles online transactions. However, when it comes to WooCommerce, you’re stepping into a platform built specifically for online selling on WordPress. Here’s what you need to know:
- Dual-System Dynamics: Many merchants leverage Lightspeed’s dual functionality, continuing to use the Lightspeed Retail POS (or even the R-Series) for brick-and-mortar operations while migrating only the eCommerce component to WooCommerce. This approach lets you enjoy the content and SEO advantages of WooCommerce without disrupting your in-store processes.
- Integrations and Plugins: Although WooCommerce is inherently designed for online transactions, you can integrate POS solutions into it via third-party plugins. For example, merchants often choose to integrate Lightspeed POS with WooCommerce to synchronize inventory, sales, and customer data. This hybrid approach enables you to maintain seamless in-store operations while benefiting from WooCommerce’s powerful eCommerce features.
Understanding the Differences in Data Structure
Before you begin your migration from Lightspeed to WooCommerce, it’s important to grasp how each platform organizes and manages your store’s data. The differences in product configuration, categorization, customer data, orders, content management, and SEO can influence your migration strategy and post-migration setup. Here’s a detailed look at these key areas:
Products
- Lightspeed: Lightspeed enables merchants to create products with multiple variants while also offering custom options, such as gift wrapping or engraving, that are added to the product without being treated as separate SKUs. This flexibility allows for detailed product personalization.
- WooCommerce: While WooCommerce natively supports product variants, it doesn’t include built-in functionality for custom options. However, you can extend WooCommerce’s capabilities with plugins like WooCommerce Product Add-Ons, which let you replicate custom option features and maintain your desired product structure.
Categories
- Lightspeed: In Lightspeed, product categories are organized in a multi-level, hierarchical structure that makes it easy to group items into clear parent-child relationships. Products can be associated with multiple categories to facilitate targeted browsing.
- WooCommerce: WooCommerce also supports hierarchical categorization and allows a product to belong to multiple categories. The management of these categories is handled through WordPress’s flexible taxonomy system, which can be customized to suit your storefront’s navigation needs.
Customers
- Lightspeed: In Lightspeed, each customer profile is equipped with both a billing address and a shipping address. This dual-address capability ensures that merchants capture all necessary details for accurate order processing, invoicing, and delivery, facilitating efficient management of both domestic and international orders.
- WooCommerce: Similarly, WooCommerce allows each customer account to maintain a separate billing and shipping address. This approach provides flexibility for customers who may have different addresses for billing and delivery, thereby enhancing the checkout experience and ensuring seamless order fulfillment.
Orders
- Lightspeed: Orders in Lightspeed are tracked using a single status field that combines both payment and fulfillment information. You might see detailed labels like “Processing Awaiting Payment” or “Completed Shipped”, which provide granular insight into each order’s progress.
- WooCommerce: In contrast, WooCommerce uses a more segmented approach by distinguishing between payment and fulfillment statuses with general labels such as “Pending payment,” “Processing,” and “Completed”. This means that during migration, you may need to map Lightspeed’s composite statuses into WooCommerce’s two-tier system or consider additional order management plugins for more detailed tracking.
Blog Posts
- Lightspeed: Lightspeed’s blogging functionality is basic, offering straightforward content creation and category classification. It is sufficient for stores that require simple content marketing but may lack advanced customization options.
- WooCommerce: Powered by WordPress, WooCommerce provides a robust content management system that supports advanced blogging capabilities, rich media integration, and powerful SEO tools. This makes it easier to optimize your blog posts and pages for search engines while offering a dynamic user experience.
SEO and URL Handling
- Lightspeed: Lightspeed comes with built-in support for meta titles and descriptions and uses its own unique URL structure for products and categories, which helps maintain consistent SEO settings without much additional configuration.
- WooCommerce: WooCommerce relies on SEO plugins like Yoast SEO or RankMath to manage meta data, and its URL structure differs from Lightspeed’s. This requires careful handling of URL redirects (often managed with dedicated plugins) to ensure that your existing SEO rankings and inbound links are preserved during and after the migration.
Migrating from Lightspeed to WooCommerce with Next-Cart
Next-Cart’s Lightspeed to WooCommerce migration tool streamlines the entire data transfer process, making it effortless to transition from Lightspeed to your new WooCommerce store. Follow these steps to embark on a smooth and efficient migration journey.
1. Set up the connection
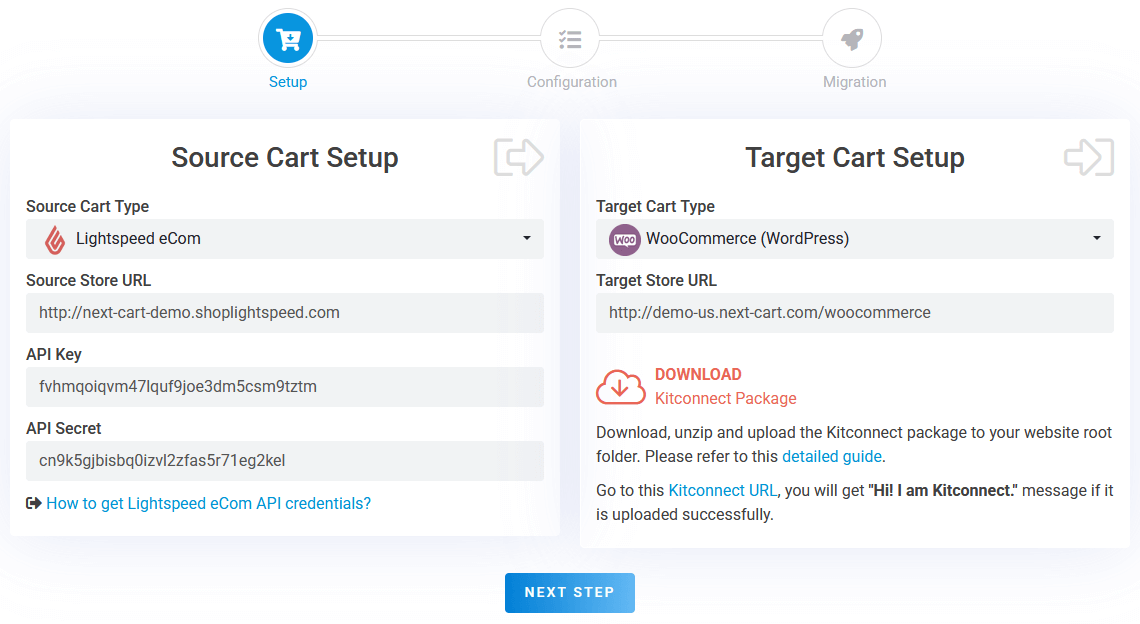
Lightspeed to WooCommerce – Setup Connection
During the setup step, you need to select the Lightspeed version you want to migrate; for example, eCom, R-Series, S-Series, Vend, etc. Then, establish a connection between the migration tool and your two stores:
- Lightspeed (Source Store): Depending on the version you choose, the migration tool will display the corresponding instructions to help you obtain the API Key and API Token from your store.
- WooCommerce (Target Store): Download the kitconnect package from the migration tool and upload it to your WooCommerce/WordPress website’s root directory via cPanel or FTP.
After your Lightspeed and WooCommerce stores are successfully linked, simply select “Next Step” to move forward with your migration process.
2. Configure the migration
In the configuration step, you’ll find three sections where you can set up and customize the migration process to perfectly suit your needs.
Entities Selection
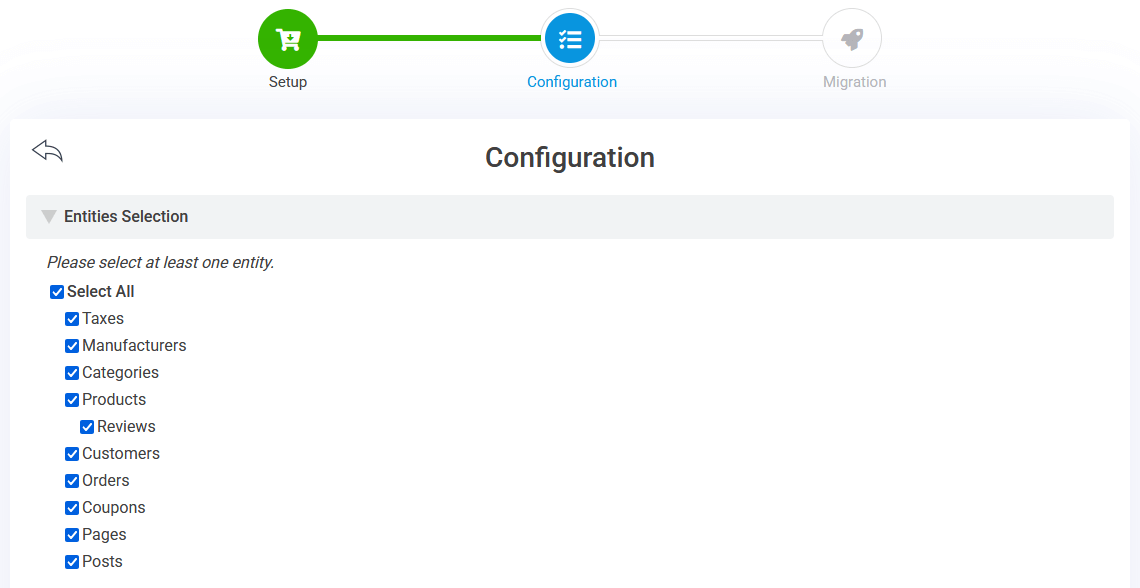
Lightspeed to WooCommerce – Entities Selection
In the first section, you can choose the data types you want to migrate, including:
- Products
- Categories
- Manufacturers
- Taxes
- Customers
- Orders
- Coupons
- Reviews
- Blog Posts
- CMS Pages
Additional Options

Lightspeed to WooCommerce – Additional Options
In the second section, you can fine-tune your migration with key features:
- Continue the previous migration: If you have ongoing changes, choose to continue a previous migration so that new data (like orders or customer registrations) is imported without duplication.
- Preserve Order IDs: Retain your original Lightspeed order numbers to ensure seamless tracking and consistent reference throughout your order history.
- Migrate SEO URLs: Ensure that your Lightspeed SEO-friendly URLs are properly redirected in WooCommerce using Next-Cart’s URL Redirects plugin.
Advanced Attributes Mapping
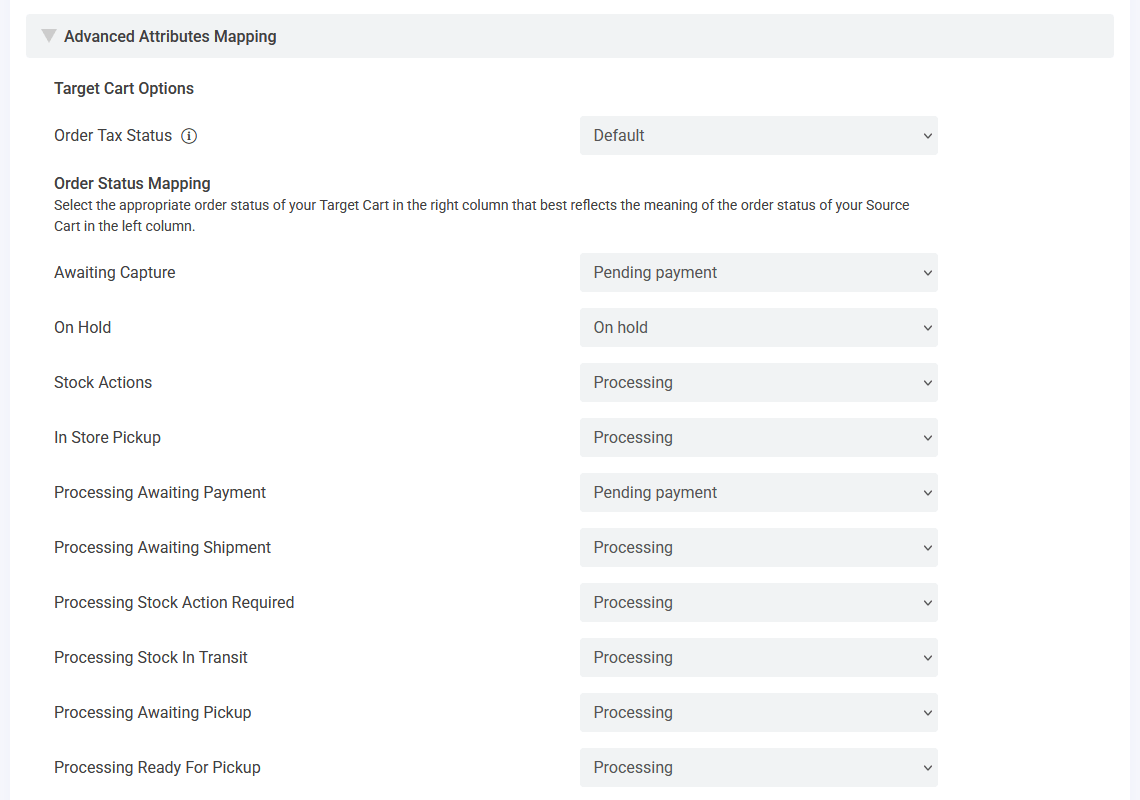
Lightspeed to WooCommerce – Attributes Mapping
In the third section, you should map order statuses between Lightspeed and WooCommerce:
- Order Tax Settings: Define your order tax settings by choosing whether the tax is included, excluded, or defaults to the standard option; this guarantees accurate financial tracking.
- Order Statuses: Synchronize your order statuses by aligning Lightspeed’s statuses with those in WooCommerce, ensuring a smooth and consistent order management workflow.
3. Start the migration
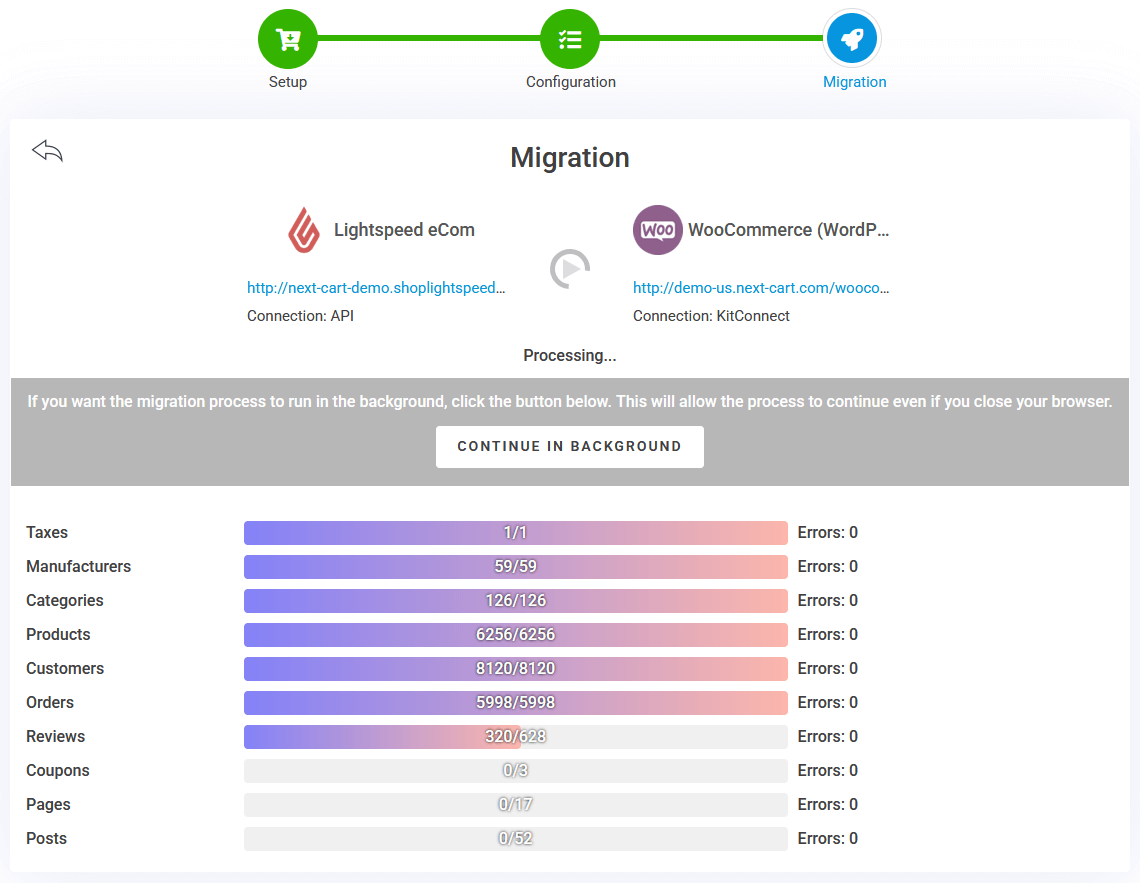
Lightspeed to WooCommerce – Migration Process
Once you have reviewed and confirmed all your migration settings, initiate the migration process with the Lightspeed to WooCommerce migration tool. The tool will begin transferring your data, and the overall duration will depend on the volume of your data and your network speed, ranging from just a few minutes to several hours. If you need to continue working without interruption, you have the option to send the migration process to run in the background. Throughout the migration, you can monitor progress in real time via the tool’s dashboard, and upon successful completion, you will receive a clear confirmation message verifying that all data has been accurately transferred.
Post-Migration Adjustments
After your data has been successfully migrated, it’s time to fine-tune your new WooCommerce store. These post-migration steps ensure that every aspect of your store functions optimally:
1. Verify and organize data
- Products and Categories: Confirm that all products, including their variants and (if applicable) merged custom options, are correctly imported. Review your category hierarchy and adjust WordPress menus if needed to enhance navigation.
- Orders and Customers: Check that customer details, including billing and shipping addresses, are accurately represented. Verify that order histories match and that order statuses have been mapped correctly.
- Blog and CMS Content: Ensure that all blog posts, pages, and media files have been migrated without loss. Optimize the content formatting to take full advantage of WordPress’s editing tools.
2. Configure WooCommerce features
- Themes and Design: Select a WooCommerce-compatible theme that reflects your brand identity. Customize layouts, fonts, and colors using the WordPress Theme Customizer.
- Payment, Shipping, and Tax Settings: Set up payment gateways (like WooCommerce Payments, PayPal, or Stripe) and configure shipping options, zones, and tax rules. Test these configurations with sample orders.
- SEO and URL Redirects: Use SEO plugins to manage meta tags and optimize page content. Ensure your URL Redirects plugin is active so that all legacy Lightspeed URLs seamlessly point to your new WooCommerce pages.
3. Test and optimize your store
- Simulate Transactions: Run several test orders to verify that the checkout process, payment processing, and shipping calculations work correctly across various devices.
- Performance and Analytics: Monitor site speed and performance. Use tools like caching, image compression, and a Content Delivery Network (CDN) to improve loading times. Set up WooCommerce Analytics and integrate Google Analytics to track visitor behavior and sales trends.
4. Integrate POS systems (if applicable)
If you’re retaining your Lightspeed Retail POS, configure the necessary integrations to synchronize inventory and sales data between your physical store and WooCommerce. Dedicated plugins can help you connect Lightspeed POS R-Series with WooCommerce, ensuring that both systems work in tandem.
Of course, if you decide to migrate all data from Lightspeed R-Series into WooCommerce and are considering a new POS system for your store, you still have plenty of options. However, we recommend choosing a popular, locally-appropriate POS service to guarantee maximum compatibility between the hardware and software in your POS system.
Final Thoughts
Migrating from Lightspeed to WooCommerce offers a strategic advantage – unlocking the vast customization and SEO potential of WordPress while maintaining the robust in-store capabilities of Lightspeed Retail POS. By understanding the differences in data structure, carefully planning your migration with Next-Cart’s migration tool, and performing thorough post-migration adjustments, you can ensure a seamless transition that minimizes downtime and preserves your business integrity.
Take your time to verify every detail, and don’t hesitate to leverage third-party plugins to extend functionality where needed. If you have any questions or need further assistance, our team is here to help you every step of the way. Happy migrating and welcome to the enhanced world of WooCommerce!