As mentioned in our previous blog, X-Cart is a self-hosted eCommerce platform, while Shopify is a cloud-based solution. Many people assume that cloud-based platforms are more limited compared to self-hosted ones, but in this case, the opposite is true -> X-Cart’s customization and scalability are much more restricted than Shopify’s. There are two key reasons for this:
- Even though X-Cart is self-hosted, it’s not free. Users have to pay a substantial monthly fee to unlock advanced features and data customization.
- Shopify benefits from a massive user community and an extensive app marketplace, where you can easily find and integrate almost any feature you need into your store.
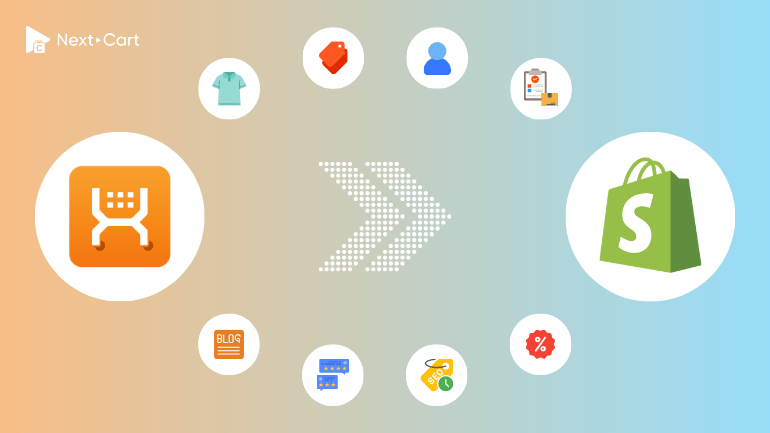
As businesses grow, most store owners choose to migrate from X-Cart to Shopify to reduce costs and expand their stores. But beyond just saving money, moving to Shopify is also an opportunity to modernize your store, improve SEO, and leverage Shopify’s powerful ecosystem. However, migration can present certain challenges due to differences in data structures and platform functionalities. In this guide, we’ll walk you through every step of the process using Next-Cart’s X-Cart to Shopify migration tool, covering everything from fine-tuning your product catalog and preserving customer data to ensuring a smooth SEO transition.
- Understanding the Key Differences in Data Structure
- Migrating from X-Cart to Shopify with Next-Cart
- Video Tutorial
- Post-Migration Adjustments & Optimization
- 1. Verifying and Organizing Data
- 2. Configuring Shopify’s Core Features
- 3. Testing & Optimizing Your Store
- Final Thoughts
Understanding the Key Differences in Data Structure
Before starting the migration, it’s crucial to understand how X-Cart and Shopify handle key data elements differently. Being aware of these differences will help you anticipate challenges and plan effective solutions.
Products
- Product Options: X-Cart allows products to have three types of options: Select, Text Area, and Yes/No. Shopify, on the other hand, only supports Select-type options as variants. By default, Select and Yes/No options from X-Cart will be converted into Shopify variants, while Text Area options cannot be migrated because Shopify doesn’t support them. If your X-Cart store relies on these for custom engravings, personal messages, or other text-based inputs, you’ll need to integrate a Product Custom Options app to add this feature to your Shopify store.
- Product Attributes: Similar to custom options, product attributes in X-Cart also come in three formats. Fortunately, these can all be stored in Shopify metafields, which actually offer even more flexibility by supporting various data types, including text, date, yes/no, image, link, and file.
- Subscription Products: X-Cart natively supports subscription-based products, whereas Shopify requires an additional app – Shopify Subscriptions (Shopify’s official app) – to enable subscription functionality on your store.
Categories
- Category Structure: X-Cart supports hierarchical categories, meaning you can create parent-child category structures. Shopify, however, organizes products into “Collections”, which follow a flat structure without parent-child relationships. While this may seem limiting, you can still build a multi-level menu in Shopify to display your categories in a hierarchical way. The only drawback is that Shopify’s navigation system supports a maximum of three levels.
Customers
- Customer Segmentation: The key difference between the two platforms when it comes to customers is membership management. X-Cart allows merchants to create membership tiers such as “Wholesaler” or “Retailer”, offering customized pricing and marketing strategies for different customer groups. Shopify achieves a similar outcome through customer segments, which are based on customer attributes and metafields. You can apply discounts and marketing strategies to each segment, making this more of a terminology difference than a functional limitation.
Orders
- Order Statuses: Both platforms use two order status fields: Payment Status and Fulfillment Status – to track payment and shipping separately. However, the names and number of available statuses differ between the two platforms. During migration, ensure that order statuses are properly mapped to fit your workflow.
- Custom Options in Orders: This is one of the biggest differences to watch out for. Since X-Cart products can include Text Area options, this information may appear in customer orders. Shopify does not support this feature at the product level, but line item properties can be used to display this information within the order details.
SEO & URL Structure
- Custom URLs & Redirects: Both platforms allow custom URLs for products and categories, but Shopify uses specific prefixes:
/products/for individual products and/collections/for categories. Because of this, 301 redirects will be necessary to ensure old X-Cart URLs properly redirect to new Shopify URLs, maintaining your store’s SEO rankings. During migration, X-Cart URLs will be imported into Shopify’s URL Redirects system to prevent broken links and retain SEO value.
Migrating from X-Cart to Shopify with Next-Cart
A well-structured data migration process is the backbone of a successful transition. While it may sound complicated, the X-Cart to Shopify migration tool from Next-Cart simplifies the entire process into just three steps.
1. Setting Up the Connection
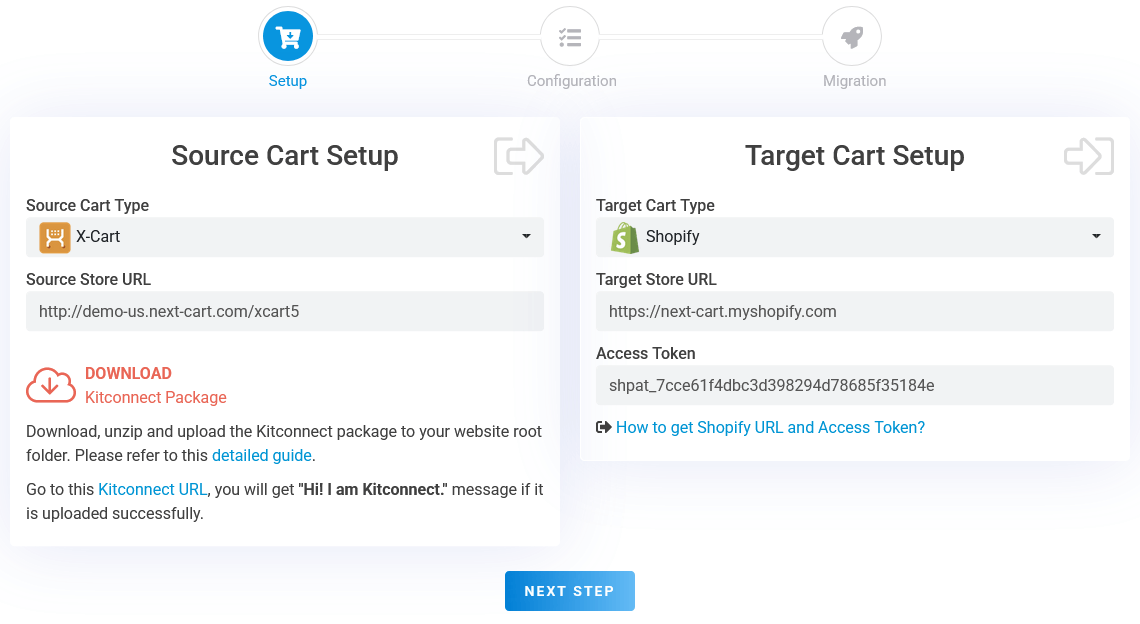
X-Cart to Shopify – Setup Connection
The first step is to establish a connection between the migration tool and your stores. This allows the tool to retrieve data from your X-Cart store and transfer it to your Shopify store.
- X-Cart Store: Download the kitconnect package from the migration tool and upload it to your X-Cart site’s root directory via cPanel or FTP.
- Shopify Store: Generate an Access Token from your Shopify admin panel and enter it into the migration tool.
Once both connections are set up, click “Next Step” to proceed to migration configuration.
2. Configuring the Migration
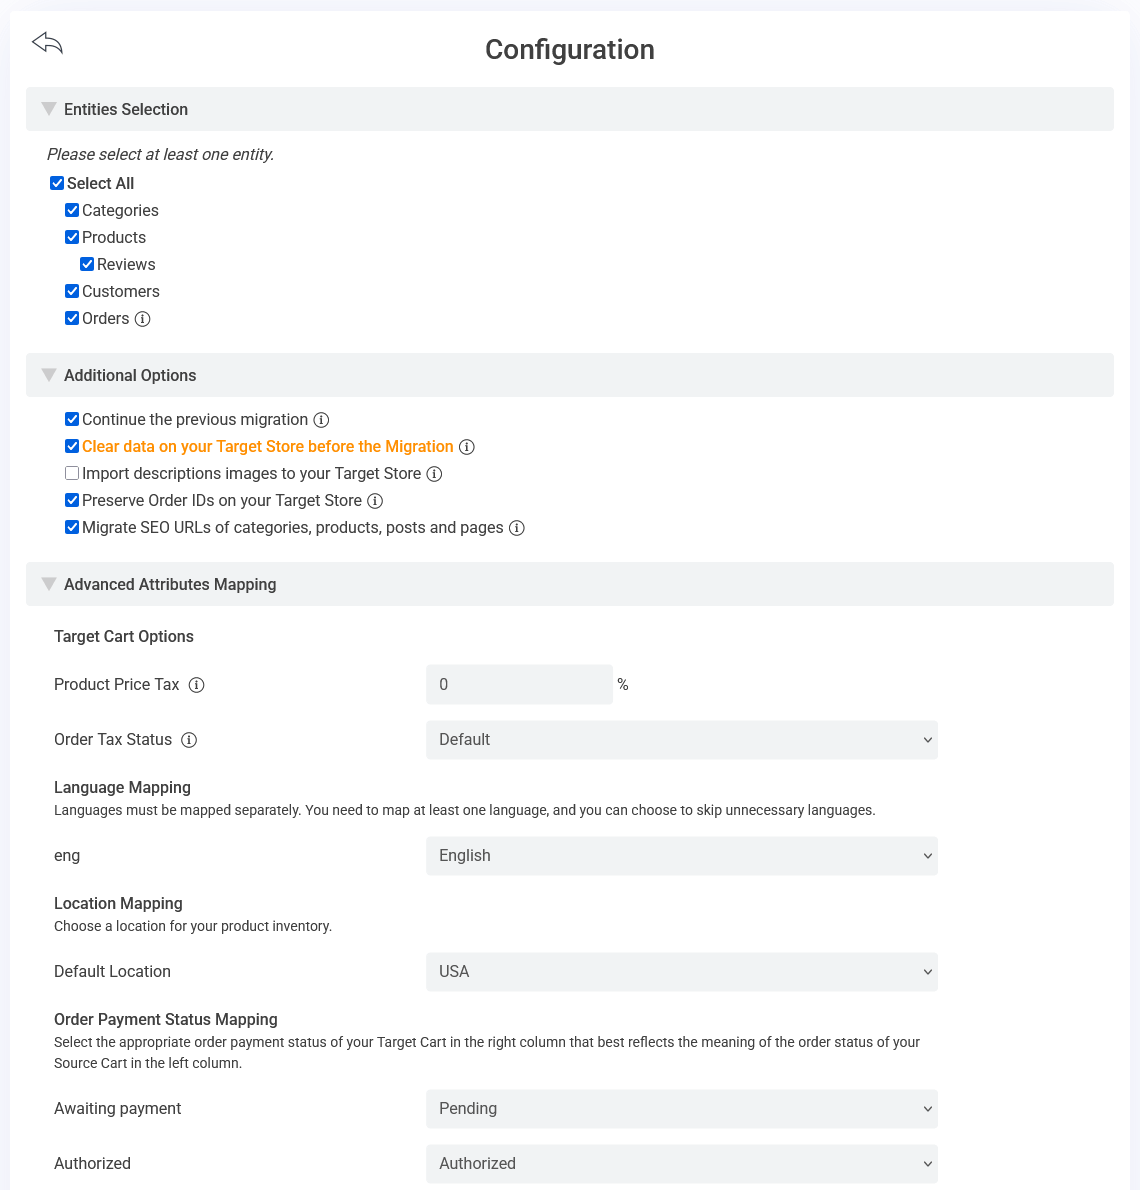
X-Cart to Shopify – Configuration
In the configuration step, you will find three sections where you can customize the migration process based on your specific needs.
Entities Selection
In this section, you can choose the types of data you want to migrate. You can either migrate all available data or select only specific types based on your requirements. The most commonly migrated entities include:
- Products
- Categories
- Customers
- Orders
- Reviews
Additional Options
The second section provides additional migration settings, allowing you to fine-tune the process. Some of the key options include:
- Migrate Only New Data: This option lets you transfer only the data that hasn’t been migrated in a previous migration attempt. If you’ve already completed an initial migration and only need to transfer newly added data, consider enabling this option.
- Preserve Original Order IDs: If you want to maintain consistency in your order records, enabling this option ensures that your original X-Cart order IDs are retained in your Shopify store.
- Migrate SEO URLs: This option transfers the SEO-friendly URLs from your X-Cart store into Shopify’s URL Redirects system. Initially, only the URL paths will be migrated, and the actual redirects will only take effect after you switch your domain to your Shopify store. To better understand how it works, you can check out this article.
Advanced Attributes Mapping
The settings in this section are crucial as they directly impact the outcome of your migration. Make sure to review and configure them carefully:
- Language Mapping: If your X-Cart store supports multiple languages, ensure that they are correctly configured and migrated to Shopify. You can also choose to exclude unnecessary languages.
- Inventory Location Mapping: If you manage multiple warehouses, don’t forget to create and map these locations in Shopify so that your inventory levels remain accurate across different regions.
- Order Status Mapping: As mentioned earlier, both X-Cart and Shopify use two fields for order statuses: Payment Status and Fulfillment Status. Make sure these statuses are mapped correctly during migration to maintain accurate order tracking.
3. Starting the Migration
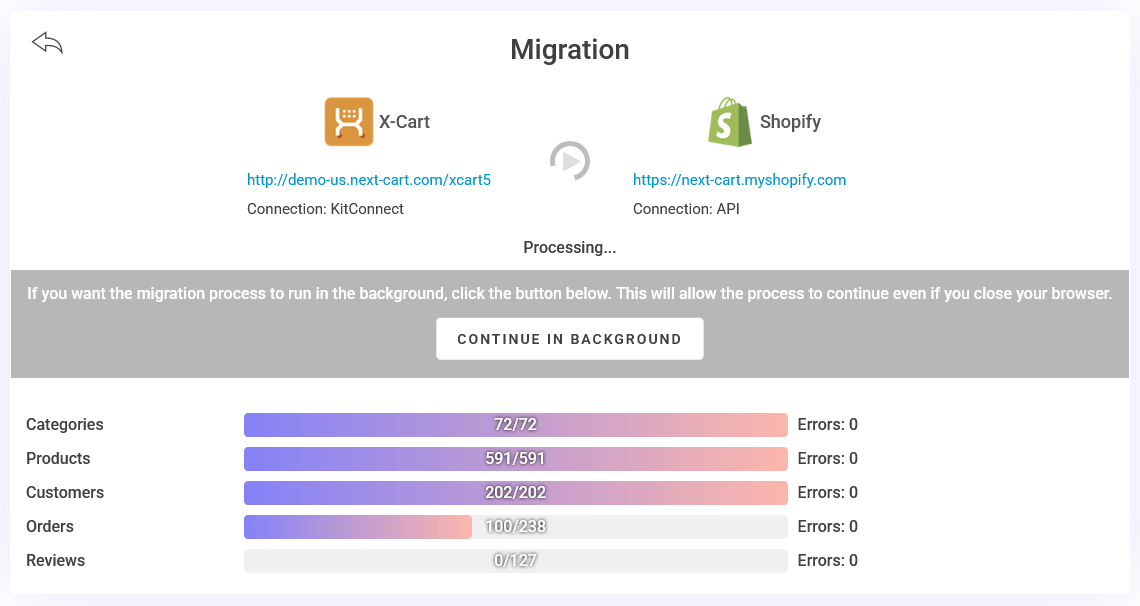
X-Cart to Shopify – Migration Process
Once all configurations are finalized, click “Next Step” to initiate the migration process. Depending on the amount of data in your store, the migration may take anywhere from a few minutes to several hours – or even longer if you have millions of orders.
You can choose to monitor the migration in real time on your computer, or let it run in the background without keeping your browser open. The migration tool will continuously update you on the progress, and once completed, it will notify you that the migration has been successfully finished.
Video Tutorial
The video below provides a step-by-step walkthrough of the three stages of data migration. Keep in mind that certain details in the video may be outdated, as both the migration tool and the platforms are continuously updated.
Post-Migration Adjustments & Optimization
Even after your data has been successfully migrated, your Shopify store isn’t fully ready yet. You’ll need to complete a few final steps to ensure everything is configured correctly before making your store live.
1. Verifying and Organizing Data
- Products & Categories: Carefully review all product details, including images, pricing, and custom options. Make sure that products are correctly assigned to their respective categories and that the category structure is properly reflected in your Shopify store’s navigation menu.
- Customers & Orders: Double-check that customer profiles and order histories have been accurately migrated. Verify that order statuses and line item properties are displayed correctly.
- URL Redirects: Ensure that all 301 redirects are working as expected. This prevents broken links and ensures that customers and search engines can still find your products through their old URLs.
- SEO Review: Use SEO auditing tools to check for broken links or missing meta data. Fine-tune your Shopify store’s SEO settings to maintain or even improve your search engine rankings.
2. Configuring Shopify’s Core Features
- Themes & Store Design: Choose a Shopify theme that aligns with your brand and customize it as needed to replicate or enhance your previous store design.
- Payment, Shipping & Tax Settings: Configure your payment gateways (such as PayPal, Stripe, or Shopify Payments), set up shipping zones, and adjust tax settings to match your business requirements.
- Email Notifications: Test and optimize your Shopify store’s transactional email settings to ensure that customers receive order confirmations, shipping updates, and other important notifications correctly.
3. Testing & Optimizing Your Store
- Comprehensive Testing: Go through the entire customer journey – from browsing and adding products to the cart to completing checkout. Test multiple orders, customer segments, and product options to confirm that everything functions properly.
- Performance Optimization: Improve your store’s loading speed by compressing images, enabling caching, and utilizing a Content Delivery Network (CDN) to ensure a fast and smooth shopping experience.
- Continuous Monitoring: Keep an eye on performance metrics, customer feedback, and SEO rankings. Ongoing optimization will help you fully leverage Shopify’s capabilities and maintain a seamless shopping experience for your customers.
Final Thoughts
Migrating from X-Cart to Shopify is a major step forward, helping you cut costs, streamline operations, and unlock new growth opportunities within Shopify’s vast ecosystem. While the transition may seem overwhelming, careful planning and the right migration tools will make the process much smoother.
If you’re considering this migration, take the time to plan each phase carefully. You don’t need to be a tech expert – services like Next-Cart and professional web developers can assist you at every step.
So, don’t let fear of complexity hold you back. If it’s the right time to switch, go for it. Happy migrating, and welcome to your new home on Shopify!