Product is an important element of any eCommerce store. However, adding a product on unwieldy platforms like Magento 2 is a big challenge for many users. The following article will guide you on how to add products on Magento 2.
- About Magento 2
- Product Types in Magento 2
- 1. Simple Product
- 2. Virtual products
- 3. Configurable Product
- 4. Grouped Product
- 5. Bundle Product
- 6. Downloadable Product
- Steps to add products on Magento 2
- Simple Product
- Step 1: After Login to the admin panel, users need to click on Catalog, select Products
- Step 2. Select the Attribute Set that you want this product to have
- Step 3. Set up product-related content
- Step 4. Set up photos and videos
- Step 5. Search Engine Optimization
- Step 6. Set up Related, Multi-Sell and Cross-Sell Products (used to drive customers to view and buy more products in the store)
- Step 7. Set up the details for the purchase process
- Step 8. Design the interface for the product
- Step 9: Publish the product
- Virtual products
- Step 1. We will still start as for Simple Product, only the object we choose will be the Virtual Product
- Step 2. Select the attribute set
- Step 3. Fill in the fields that Magento requires
- Step 4: Complete the basic settings
- Step 5. Publish and preview the product.
- Configurable Product
- Step1. Select properties
- Step 2. Enter the attribute values
- Step 3. Configure the images, price, and quantity
- Step 4. Create product configuration
- Step 5. Add product image
- Step 6. Publish the product
- Step 7. Configure cart thumbnails
- Grouped Product
- Bundle Product
- Downloadable Product
- Add Product Attribute on Magento 2
- Conclusion
About Magento 2
If you’re in the e-commerce business, you’re probably familiar with Magento, a platform owned by Adobe Systems Incorporated. Significant technological improvements such as “reduced table lock issues, improved page caching, enterprise-grade scalability, available code snippets for structured data, easier new file structures customization, CSS preprocessing using LESS & CSS URL resolver, improved performance and more structured code base” helped Magento 2 receive a warm reception from the world tech community.
(source: https://en.wikipedia.org/wiki/Magento).
In 2019 alone, Magento 2 was downloaded more than 2.5 million times, and the amount of goods bought/sold through it is estimated at $155 billion. According to data from Datanyze, the platform holds up to 3% market share in the eCommerce platform space. The above numbers are eloquent evidence of the influence of Magento 2 on the current e-commerce scene.
However, to run Magento 2 smoothly, users still need to hire programmers to handle a huge volume of records and database tables and maintain it on a dedicated server. Therefore, the maximum exploitation of Magento 2’s resources is still difficult.
Product Types in Magento 2
You may be wondering why I chose this topic about adding products? Like I said, the product is the soul of an e-commerce store. A product that meets the needs and criteria of customers as well as is beautifully displayed will stimulate shopping psychology. So even a simple operation like adding products needs to be done carefully. This makes it easier for you to work and perform other activities in the store like expanding your business or migrating your Magento store later.
Regarding the types of products you will encounter in the process of using Magento 2, we have 6 members in this large family.
1. Simple Product
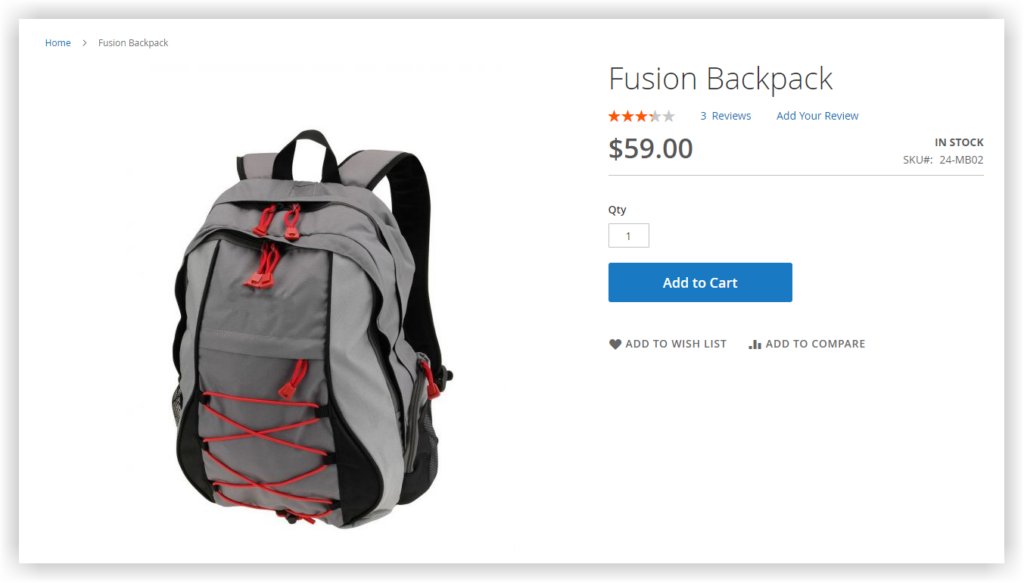
Simple Product is the most popular and basic product in Magento. As the name implies, this product is sold on a single item basis with not many items to choose from. For example, below is a pair of men’s canvas pants and there are no other options such as color or size and each product will have its own SKU to distinguish it.
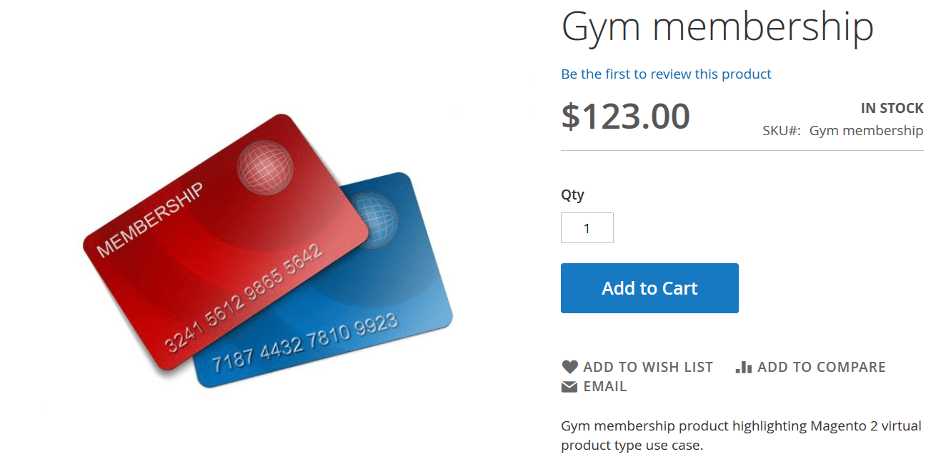
2. Virtual products
There are several virtual products such as services, memberships, warranties, subscriptions. They are virtual products, they do not require shipping or delivery. And of course, like any other product, Virtual Product also has its own SKU for each product.
3. Configurable Product
Configurable Product is a product that consists of many products made up of Simple Products or Virtual Products. Provide many options for users. For example, the same pants will have many different sizes and colors. And each color and size corresponds to a simple product or virtual product with a different SKU.
4. Grouped Product
Grouped Product consists of a group of simple products or virtual products with similar or related characteristics. Buyers can choose to buy multiple products in that group at the same time. This saves time and stimulates the psychology of shoppers.
For example, a customer may prefer a Grouped Product consisting of a plate, a fork, a bread knife, etc., rather than searching for individual items.
This type of product is a very good way to boost store sales.
5. Bundle Product
Bundle Product is similar to Grouped Product in that it consists of a group of simple products or virtual products. But the difference is that the user chooses to buy a combo of sub-products, not an individual product.
6. Downloadable Product
A Downloadable Product is anything you can download such as ebooks, videos, software, online courses, etc. After the customer watches the trailer, they will buy the product and then download the product and use it.
Steps to add products on Magento 2
Simple Product
We’ll start with the simplest product type: Simple Product.
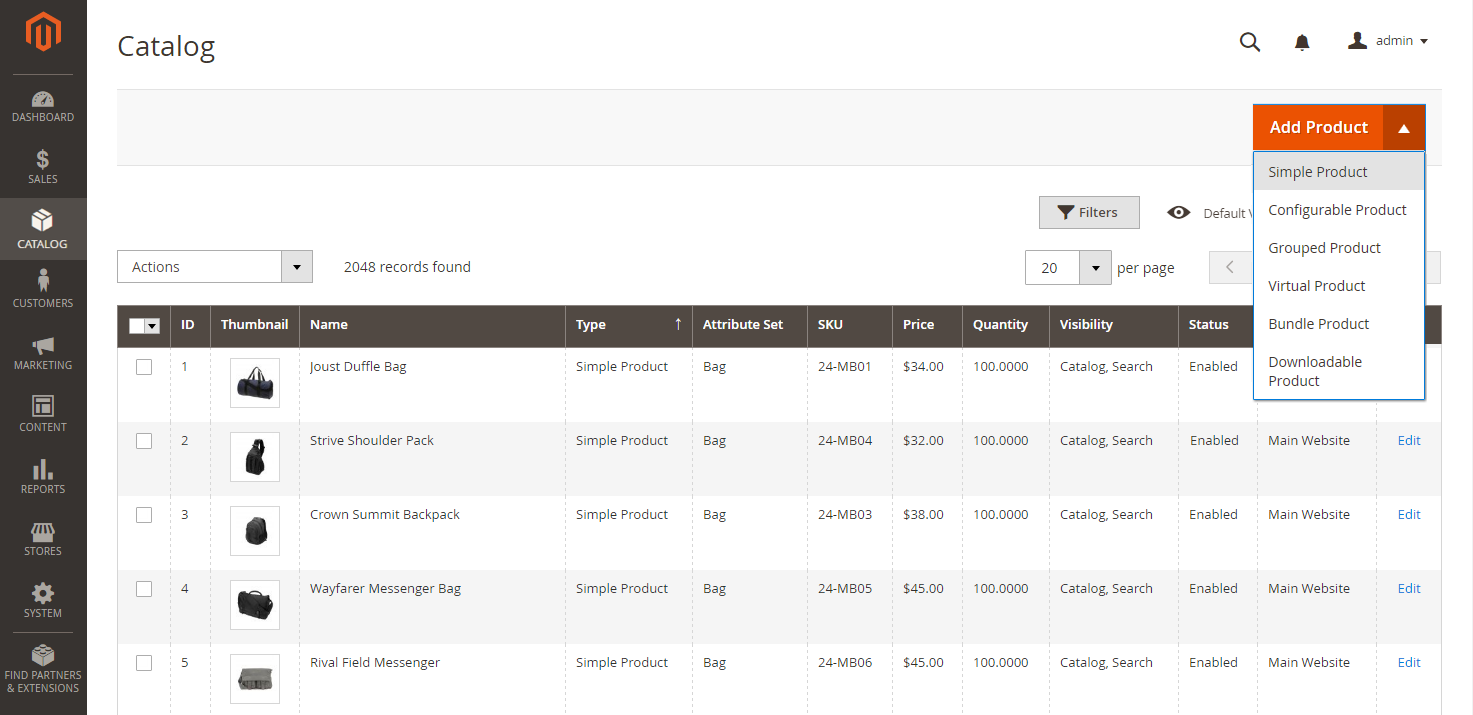
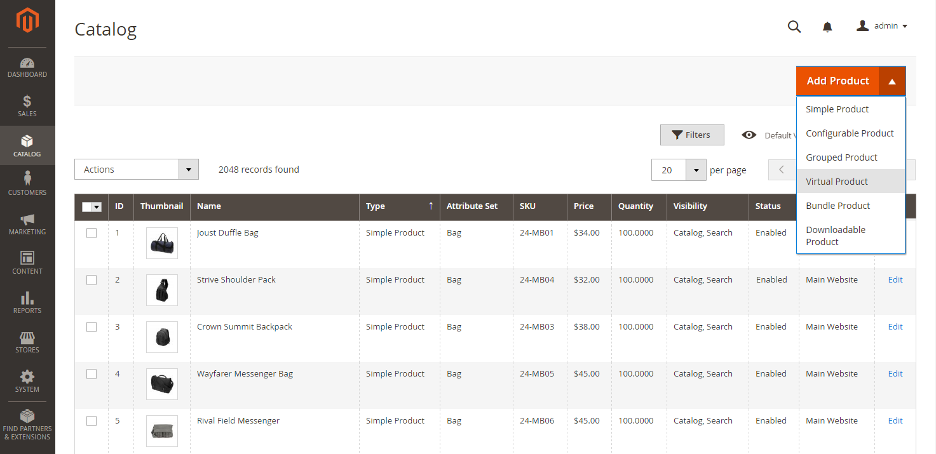
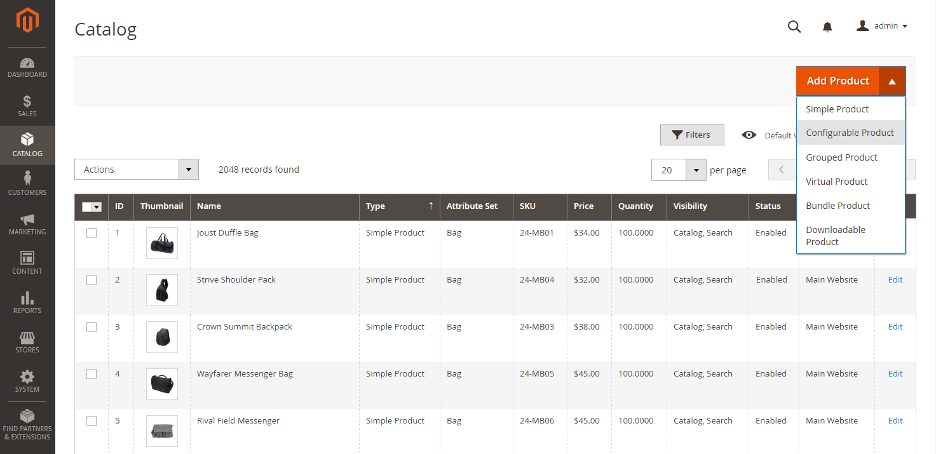
Step 1: After Login to the admin panel, users need to click on Catalog, select Products
Click Add Product and you will see an inventory at the upper-right with all the product categories I listed above. Select Simple Product.
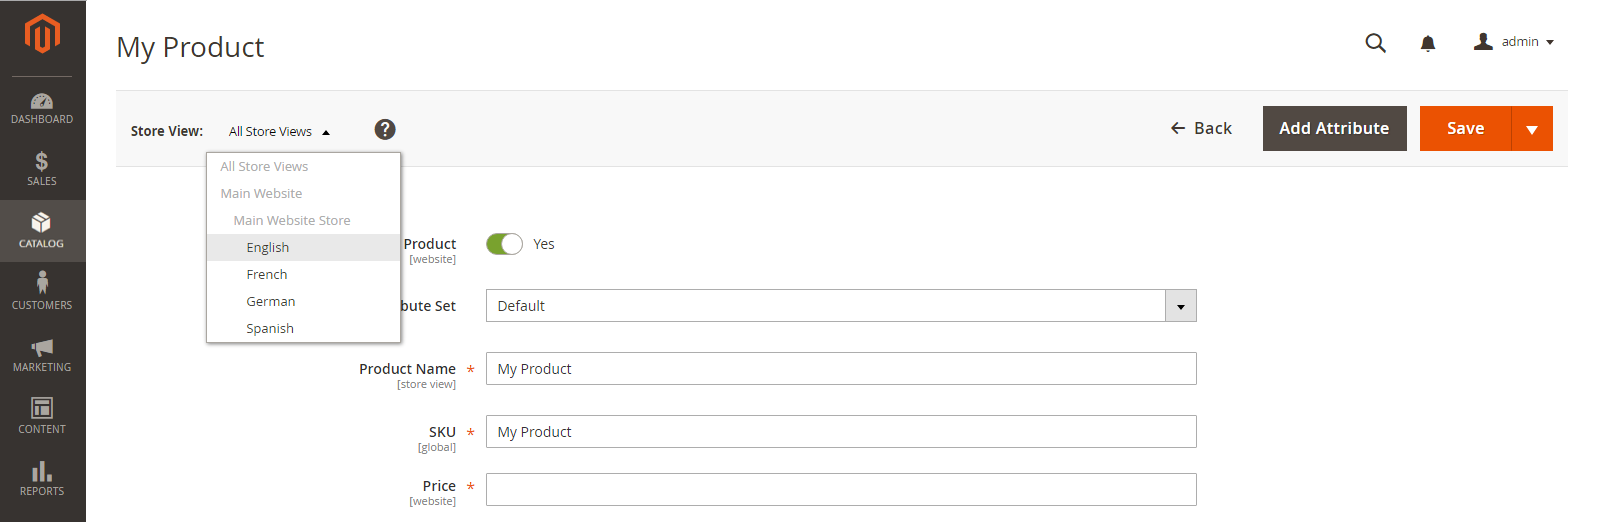
Step 2. Select the Attribute Set that you want this product to have
Magento provides a default attribute set. However, you can choose from a variety of options. In addition, you can add a new set of attributes or a new attribute.
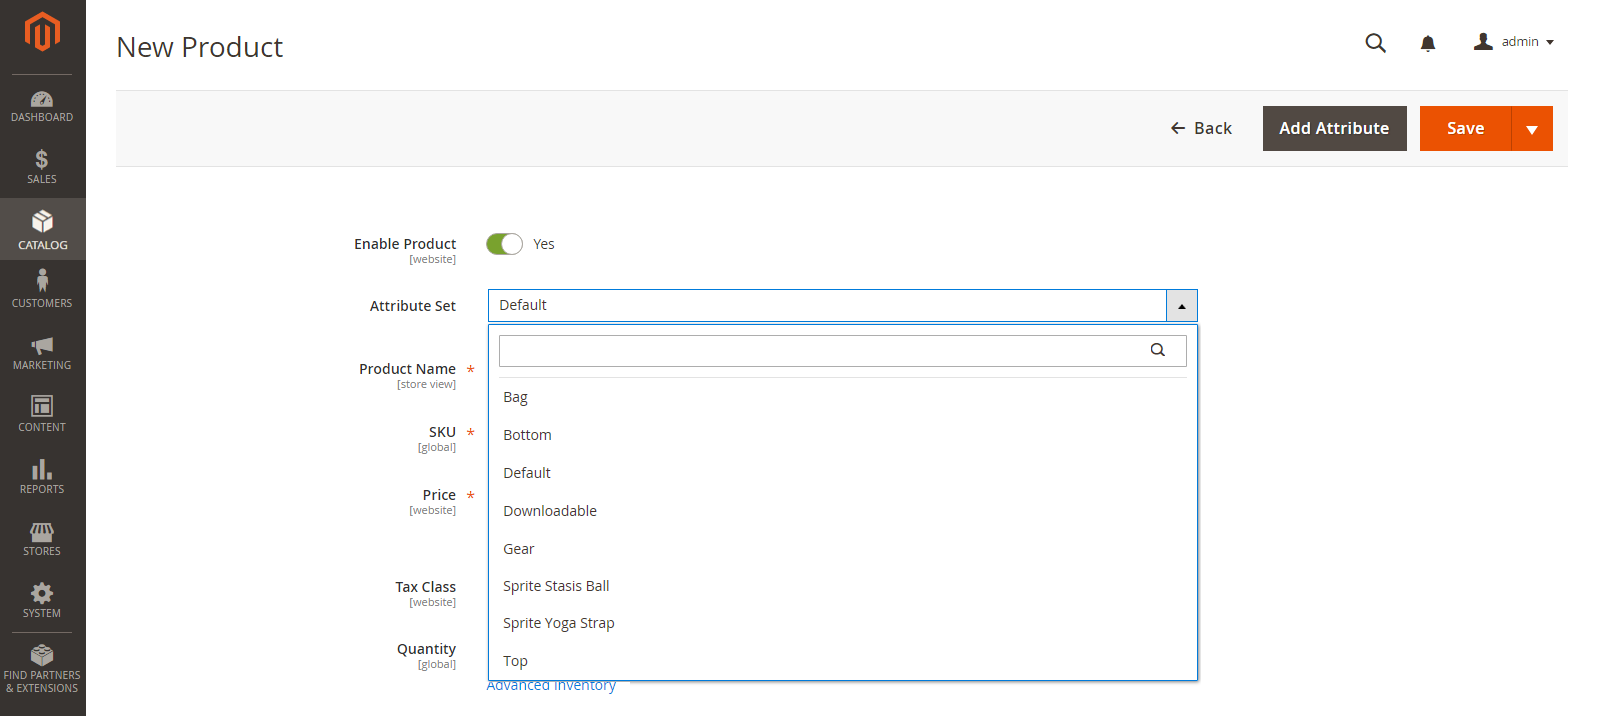
If you need to add an attribute, please pay attention to the Add Attribute button in the upper right corner of the screen
For the default set of attributes, you need to complete the product-related information in the boxes marked with * (required). We have:
- Name – The name of the product
- SKU – The Stock keeping Unit of the product (for tracking the inventory of your store)
- Price – The price value of the product
Note: In the process of setting the price of the product, you need to pay attention to the Advanced Pricing section, which is used to set up special prices during the holidays or whenever the store has a sale. You will also be asked to complete the following information for the setup process:
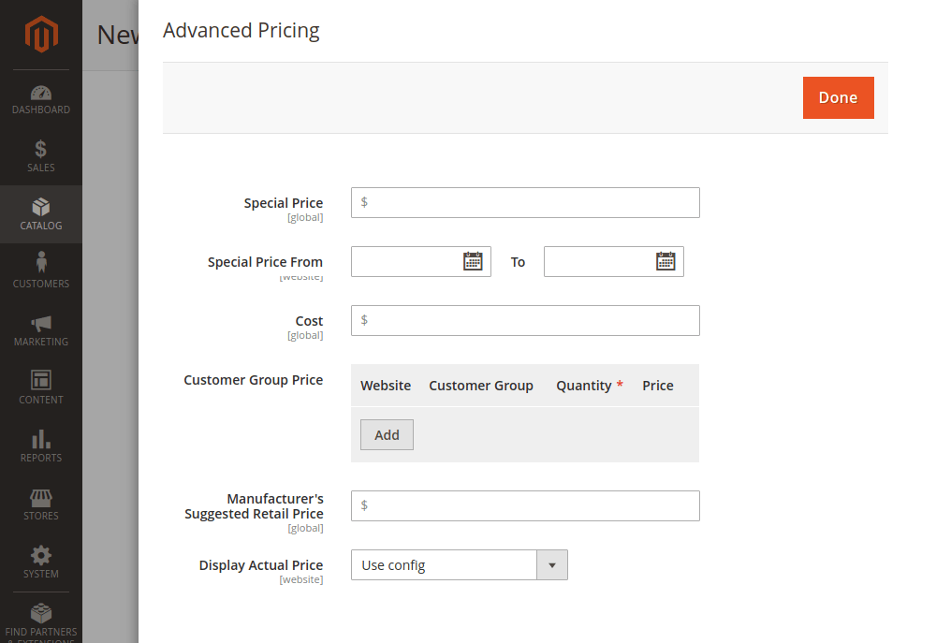
Advanced options if you need to change the price of a product for special occasions
- Special Price – Enter the discounted price
- Special Prices From & To – Set the start and end dates of the sale
- Cost – Actual price of the product
- Rates – Discounted prices are offered to customers based on customer groups and websites. Here, select the quantity and price for every customer group.
- In the Customer Group Price section, you set the quantity and price of the product that a certain group of customers on a given website will see.
- Set Manufacturer’s Suggested Retail Price.
- Choose where to display actual prices: On Gesture, In Cart, or Before Order Confirmation.
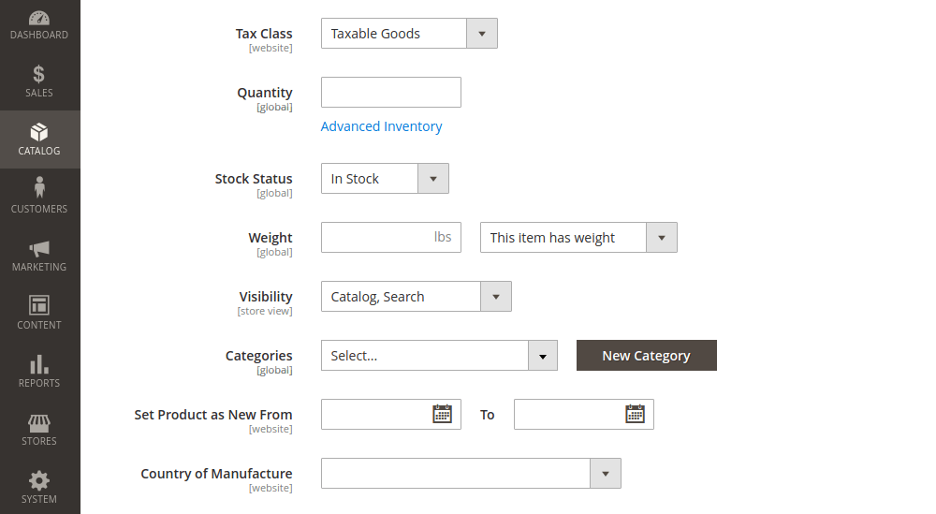
And essential attributes:
- Tax Class – Select None or Taxable Goods
- Quantity – Enter the quantity of the product currently in stock
- Availability – Set the availability status accordingly. Here, the default value is In Stock.
- Weight – Enter the weight of the product
- Set product as new from – Set date to highlight product as new
- Country of manufacture – Select a country name from the drop-down menu
- Visibility – It’s better to choose Category and Search options because when you set both options separately, customers won’t be able to see the product in the category and search for it.
Note: since simple products are often displayed as part of bundles, configurable, or grouped products, there is also the Don’t show individually option which is often used in this case.
- Category – You will need to decide which product you are adding is suitable to add to which category (existing or creating a new category).
You can also speed up the process of cataloging new products by creating dynamic category rules to automatically assign products to the catalog under certain conditions. That will allow you to create automatic categories like Brands, Discounts, Newly Added, Top Rated, etc. based on different product attributes. That is the Dynamic Category feature, but I will guide you in detail in the following articles.
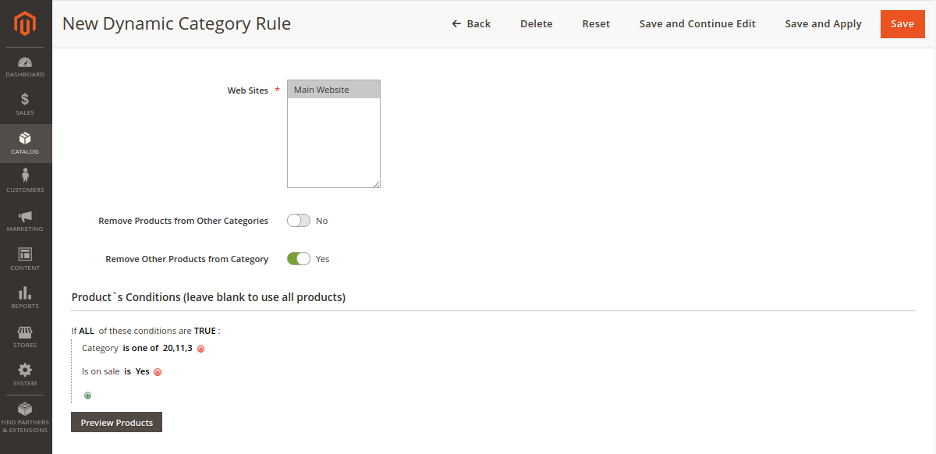
Create Dynamic Category Rule
Putting products in the right categories also makes it easier for you if you intend to migrate your store to other platforms and makes using tools like Next-Cart more effective.
Step 3. Set up product-related content
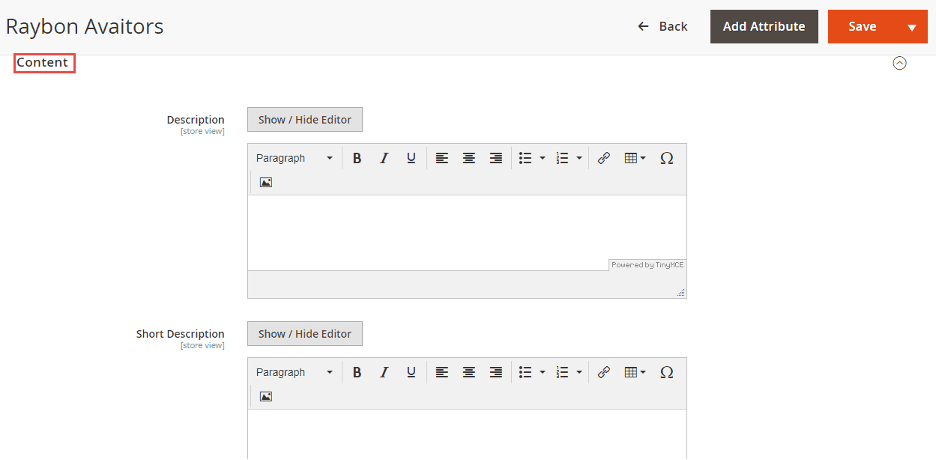
- Description – Enter an extremely concise product description for that product’s display on the store’s website
- Brief Description – This is a field where you enter the main features of your product both to give an overview to the user, as well as an RSS feed or product page, category page, etc.
Step 4. Set up photos and videos
Add images and videos to display on product pages using pop-up or drag-and-drop functionality.
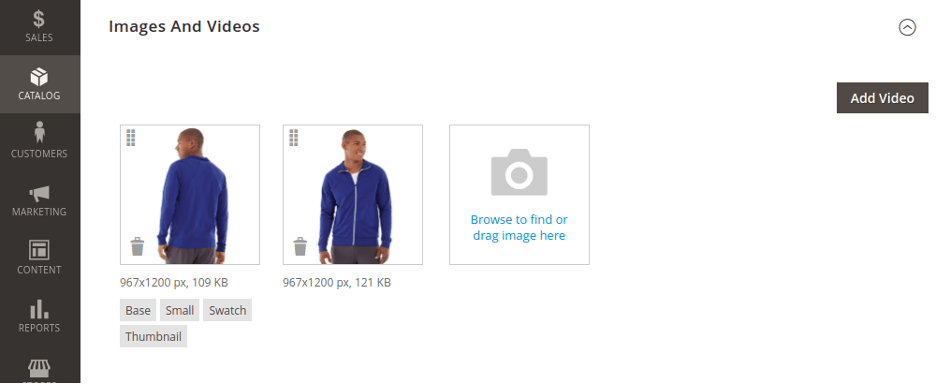
Click on the image to fill in details like Alt Text and Role:
- Alt Text – Enter text to describe the image or to display in case the image is not loaded.
- Role:
- Base – Main image for product page
- Small – Images for listings on category pages and search results, as well as for sections like Sell More, Bundle, and New Product Listings.
- Thumbnail – Images for thumbnail gallery, cart, blocks like related items
- Swatch – Used to illustrate color, pattern, or texture.
Step 5. Search Engine Optimization
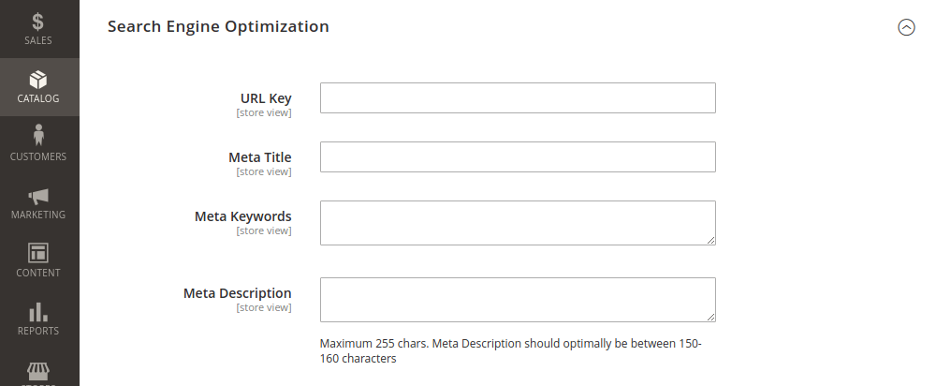
- URL Key – Enter the URL key for the product’s online address
- Meta Title – Enter a title to display in search results (Default meta title is based on product name)
- Meta Keywords -Add relevant keywords to show more in search results.
- Meta Description – Enter a description of the product to display in search results.
Note: The most reasonable Meta Description is between 150-160 characters.
Step 6. Set up Related, Multi-Sell and Cross-Sell Products (used to drive customers to view and buy more products in the store)
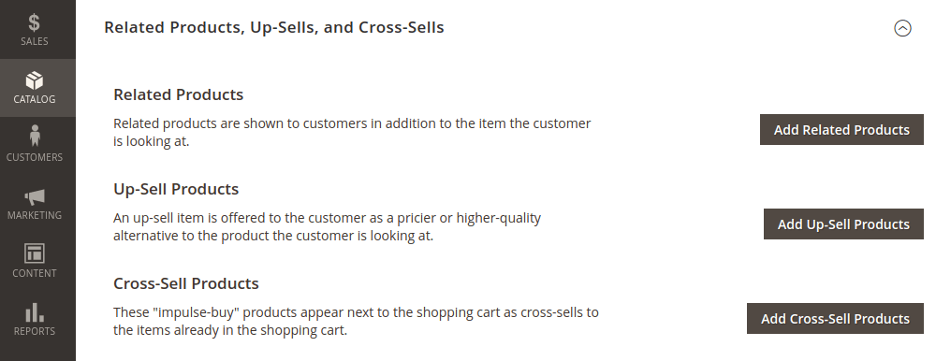
- Related Products – Add products that are expected to buy in addition to the item the customer is viewing.
- Bestsellers – Add a product similar to the one you’re creating, but possibly higher quality
- Cross-Selling Products – Add products offered on the cart page as a last-minute purchase before checkout begins.
Step 7. Set up the details for the purchase process
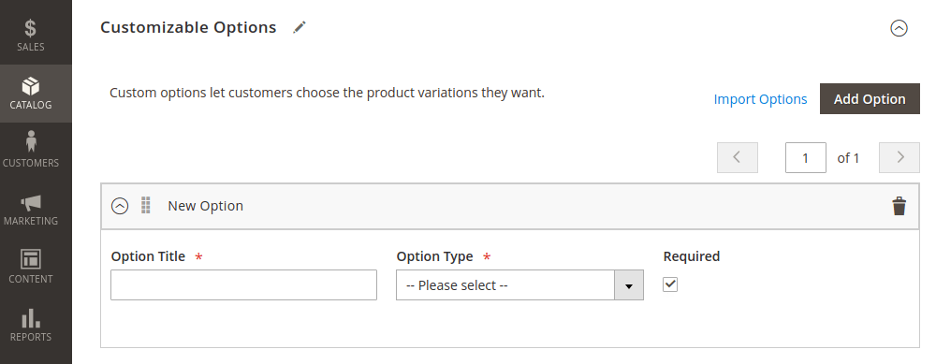
- Customizable Options – Configure this to provide customers with multiple options with multiple texts, selection, and data inputs.
- Products in Website – Choose the option where products are available according to the store hierarchy. By default, for a site installation, the site check box is ticked.

Step 8. Design the interface for the product
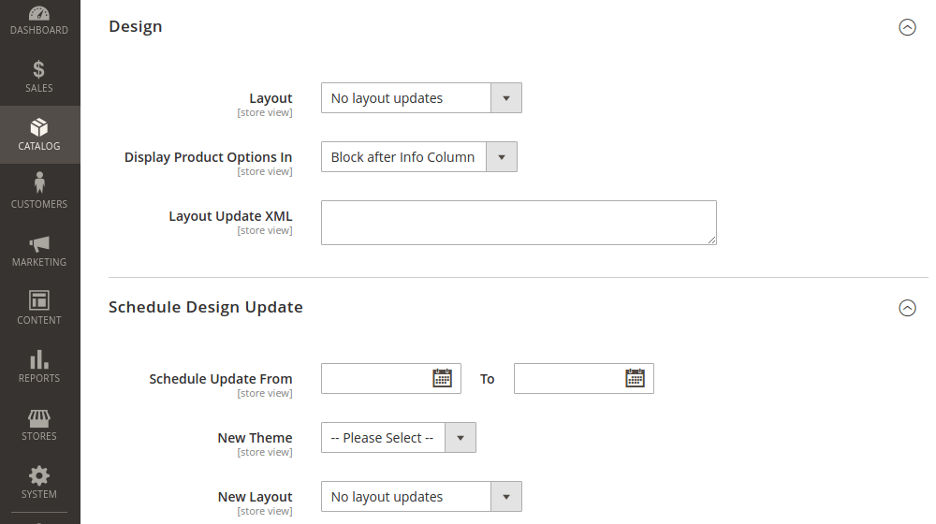
- Layout – Choose a layout from the drop-down menu
- Show Product Options In – Choose where product options appear on the product page from the drop-down menu
- Update XML layout – Import XML code in case of theme customization.
Step 9: Publish the product
If you’re ready to publish a product in your catalog, set the Enable Products to switch to Yes.
Then you do one of two following things:
Method 1: Save and Preview
In the upper right corner, click Save.

To view products in your store, select Customer View on the Admin menu. This helps you open your store in a new browser tab and preview how your products will look from the customer’s point of view.
Method 2: Save and close
On the Save menu, select Save & Close.

Virtual products
The steps to add a Virtual Product on Magento 2 are quite similar to Simple Product so I will just focus on the different steps to assist you.
Step 1. We will still start as for Simple Product, only the object we choose will be the Virtual Product
Step 2. Select the attribute set
To select the set of attributes to be used as a template for a product, do one of the following:
In the Search box, enter the name of the template you want to use. After the list appears, select the attribute set you want to use.
Step 3. Fill in the fields that Magento requires
Enter the Product Name.
Accept the default SKU based on the product name or enter another SKU.
Enter the product price.
Since the product is not ready to publish, set Enable Product to No.
Click Save and continue.
Step 4: Complete the basic settings
Set Tax Type to one of the following:
- Not available
- Taxable goods
Enter Quantity of products currently in stock and do the following:
Accept the default Stock Status setting of In Stock.
We will omit the Weight field because virtual products have no weight.
Choose the default mode in Visibility so that the product can display Categories, Searches.
For the category section, click the Select… box and do one of the following:
If it is an already existing category, start typing in the box to find a match then select the desired category.
If it is a new category, click New Category, enter a name and choose the Parent Category to define its position in the menu structure.
Continually perfecting information including Content, Images, and Videos, Search Engine Optimization, Related Products, Multi- and Cross-Selling, Customizable Options, Products on Site, Design, Gift Options, Downloadable Info.
This Downloadable Product option is disabled by default. Enabling this feature for a virtual product will make the product Downloadable.
Step 5. Publish and preview the product.
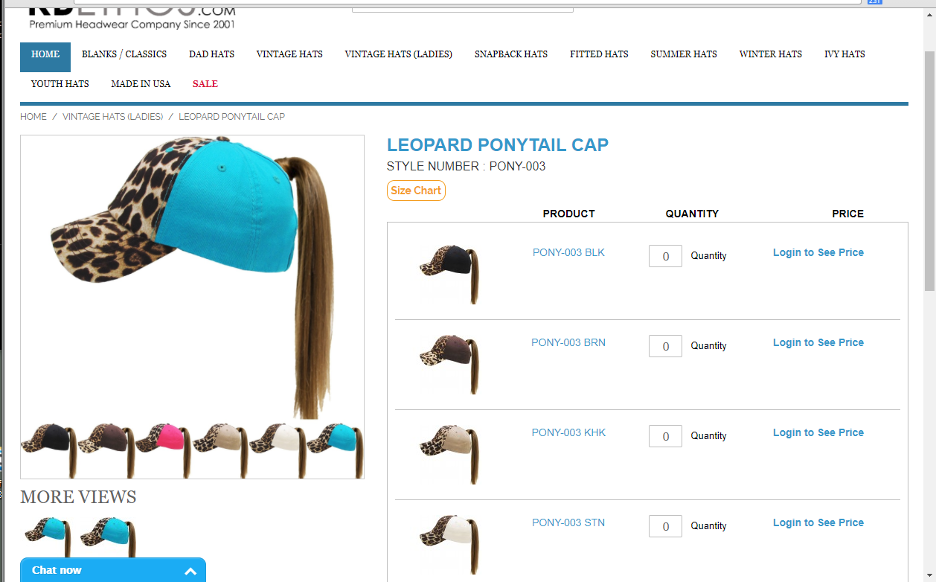
Configurable Product
Are you selling a shirt in different color schemes? Setting up Configurable Product will help you solve this problem. Plus you can follow the track inventory for each product variation. While it takes longer to set up, this type of product saves you more time in the long run.
To get the most out of it, clearly define what makes each product different. For example, a shirt with different colorways or different sizes for different ages.
We will still follow the same steps when adding a Simple Product from step 1 to step 8 as I described above.
Here is the part you need to pay attention to Adding configurations.
Your entire work history will be reflected on the Progress Bar. Try to keep up!
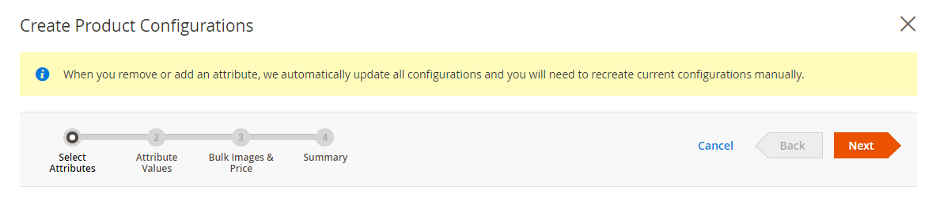
Progress Bar
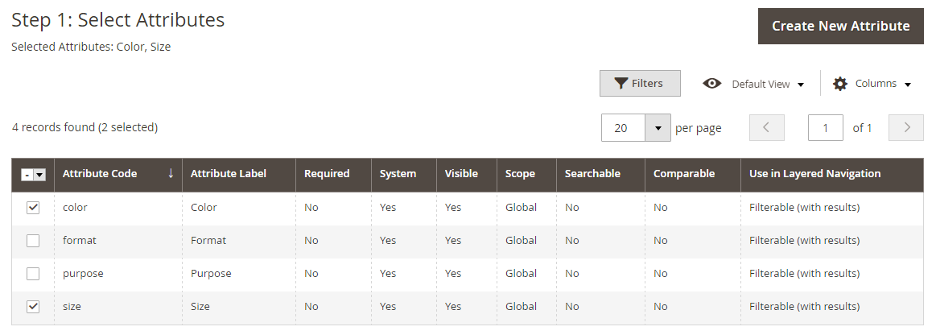
Step1. Select properties
Scroll down to the Configurations section and click Create Configuration. Then click the checkbox of the attribute that you want to set as the product difference.

If you want to add a new attribute that is not already in the table, click Create New Attribute, fill in the new attribute and click Save Attribute. Continue to select the checkbox of that attribute.
In the upper right corner, click Next.
Step 2. Enter the attribute values
Once you’ve selected an attribute, you’ll get a table that includes the values corresponding to those attributes. The defaults are very comprehensive and almost completely cover the properties selected by the user.
To rearrange the attributes, grab the Change Order () icon and move the section to a new position. The order determines the position of the drop-down lists on the product page.
Click the Next command button on the process bar to continue.
Step 3. Configure the images, price, and quantity
This step defines the unique attributes of each product such as image, price, and quantity. The options available are the same for each, and you can only choose one. You can apply the same setting to all SKUs, apply a unique setting to each SKU, or skip the setting for now.
Configure the image:
Method 1: Apply a set of images to all SKUs
Select Apply a single set of images to all SKUs.
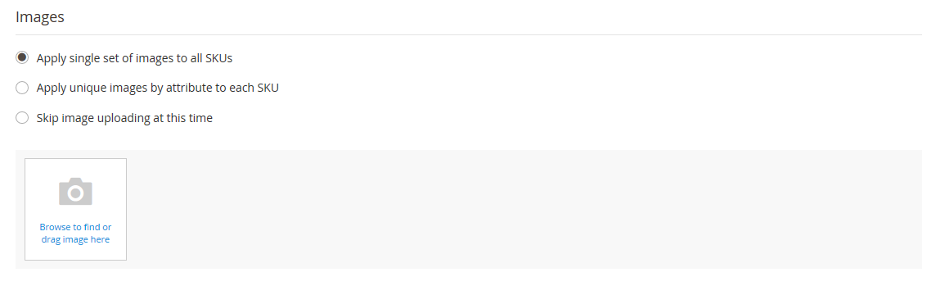
Browse to each image that you want to include in the product gallery or drag them into the box.
Method 2: Apply separate images to each SKU
With each different color of the pants, you will have a similar illustration. This method helps to improve the intuitiveness of customers when choosing products.
Select Apply unique images by attribute to each SKU.
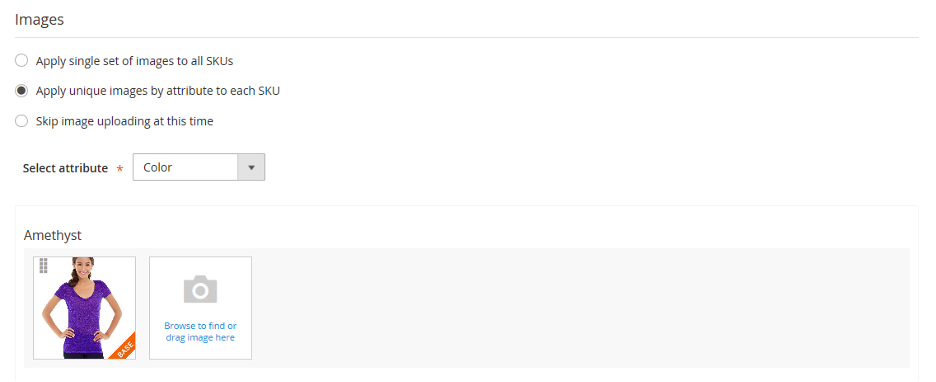
Select the properties that the image illustrates, such as color.
For each attribute value, browse to the images that you want to use for that profile, or drag them into the box.
If you drag the image into a value box, it also appears in sections for other values. If you want to delete the image, click the Trash can icon ().
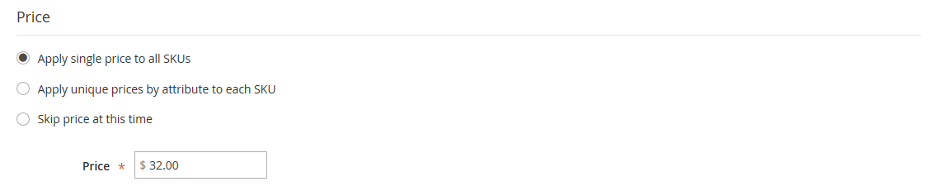
Configure pricing:
Method 1: Apply the same price to all SKUs
You can select Apply single price to all SKUs if all variants have the same selling price.
Enter price.
Method 2: Apply a different price to each SKU
With many brands, products with different color schemes or materials will have very different values. In this case, select Apply unique prices by attribute to each SKU.
Select the attribute that is the basis of the spread.

Enter a price for each attribute value.
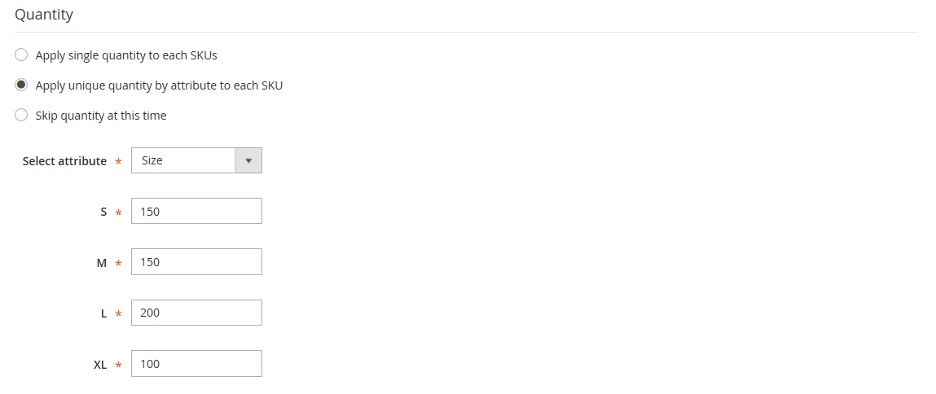
Configure the quantity:
Method 1: Apply the same quantity to all SKUs
If the quantity is the same for all SKUs, select Apply single quantity to each SKU and enter the quantity.
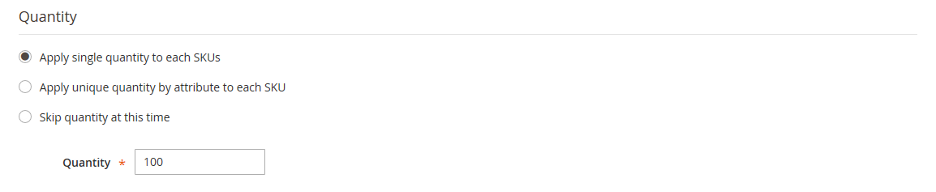
Method 2: Apply different amounts by attribute
If the quantity is different for each SKU, select Apply unique quantity by attribute to each SKU and enter the quantity for each SKU.
When the configuration for images, prices, and quantities is complete, click Next in the upper right corner.
Step 4. Create product configuration
Wait a moment for the list of products to appear and do one of the following:
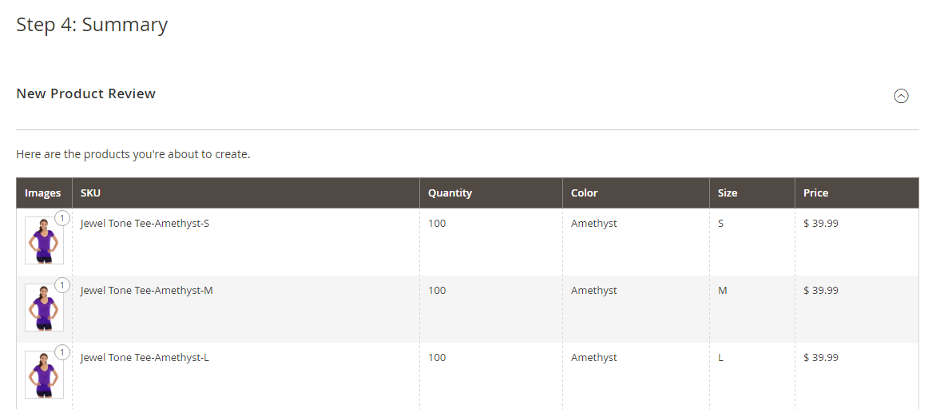
If you are satisfied with the configuration, click Next.
To repair, click Back.
Step 5. Add product image
Each different variant has certain points to distinguish. So it is most reasonable that you will add images and videos for customers to refer to.
Scroll down and expand the Images and Videos section.
Click the Camera tile and browse to the main image/video that you want to use for the configurable product.
Step 6. Publish the product
If you’re ready to publish a product in your catalog, set Enable Product to Yes and do one of the following:
Method 1: Save and Preview
In the upper right corner, click Save.
To view products in your store, select Customer View on the Admin menu. This helps you open your store in a new browser tab and preview how your products will look from the customer’s point of view.
Method 2: Save and close
On the Save menu, select Save & Close.
Step 7. Configure cart thumbnails
If you have a different image for each variation, you can configure it to use the correct image for the cart thumbnail.
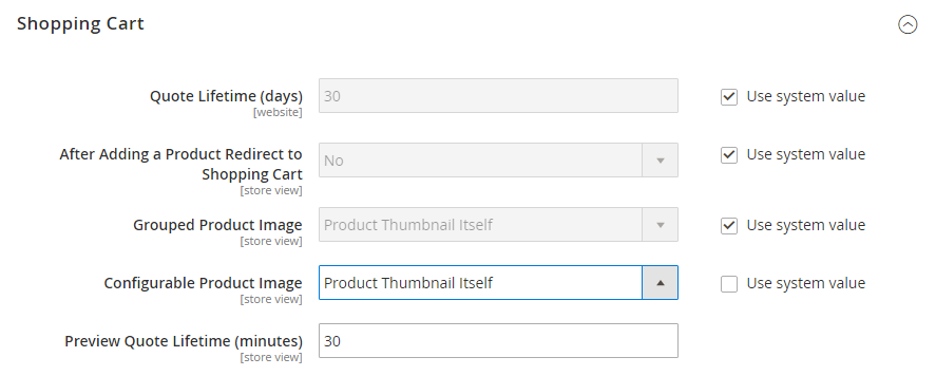
Select Stores, click Settings, and select Configuration.
In the left panel, expand Sales and select Payments below.
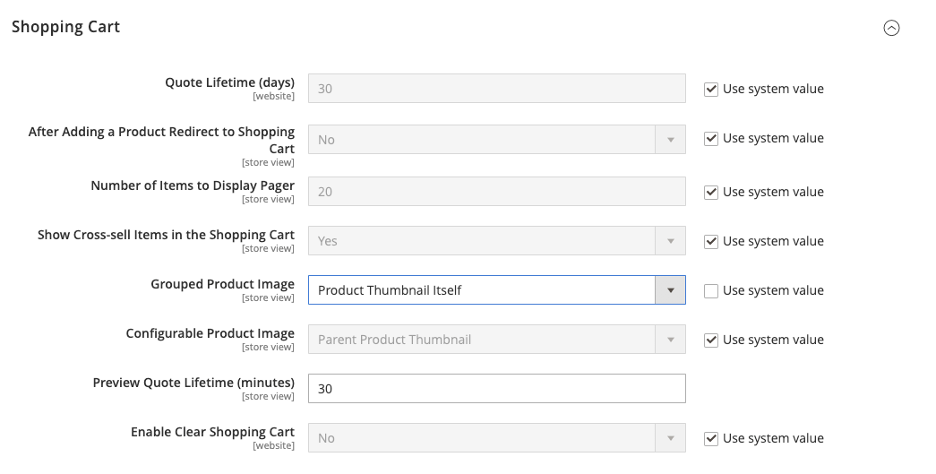
Expand the Cart section.
Set the Configurable Product Image to Product Thumbnail Itself.
When done, click Save Configuration.
Grouped Product
In general, the steps to add Grouped Product on Magento 2 are similar to the product types that I have listed above. Therefore, we will also go into a separate point of this process.
After you have selected the objects that are grouped products and completed the mandatory requirements of Magento such as filling in the required information (Name, SKU, Price), completing the required attributes of a product, etc. will take the most important step of grouping products together to create Grouped products.
The right “ingredients” to create grouped products are Simple Products and Virtual Products.
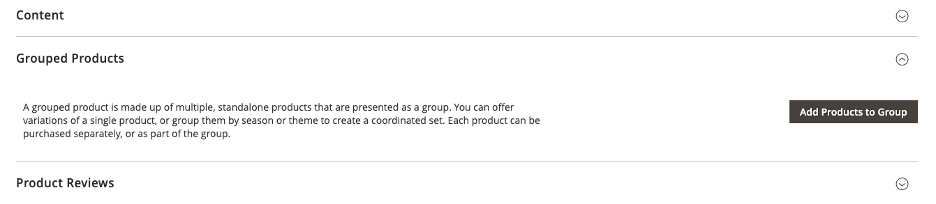
To do this, you Grouped Products section and click Add Products to Group.
If necessary, use the filter to find the products you want to include in the group.
In the list, select the checkbox for each item you want to include in the group.
Click Add selected products to add them to the group.
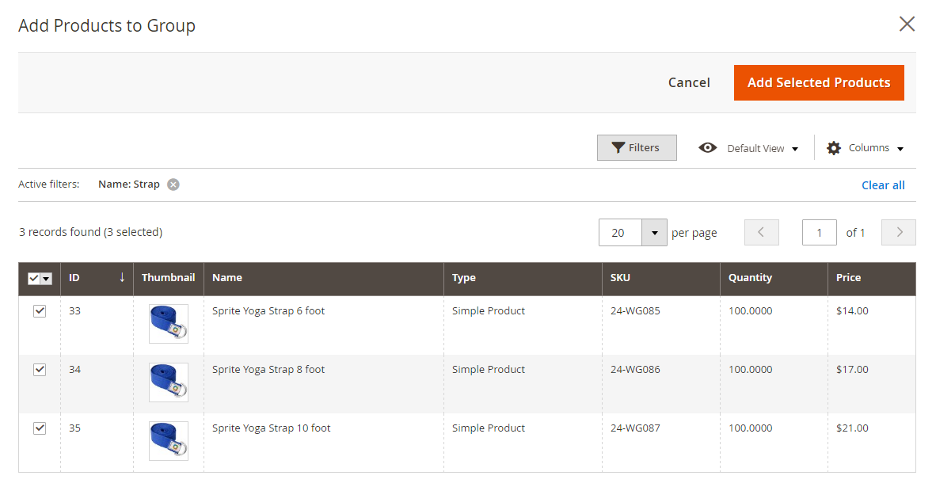
Remember to check the checkbox so you don’t miss any products!
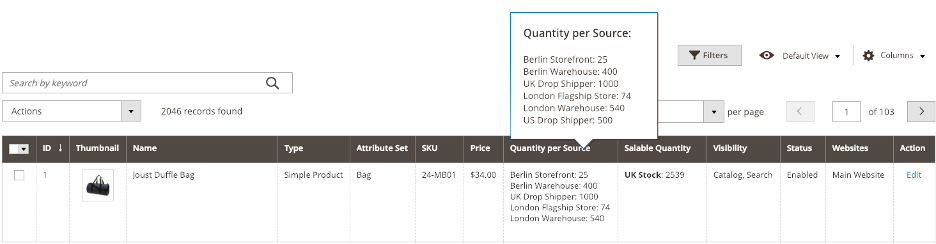
For Multi-Source sellers with Inventory Management, the grid includes a Quantity Per Source column with each source specified and the inventory.
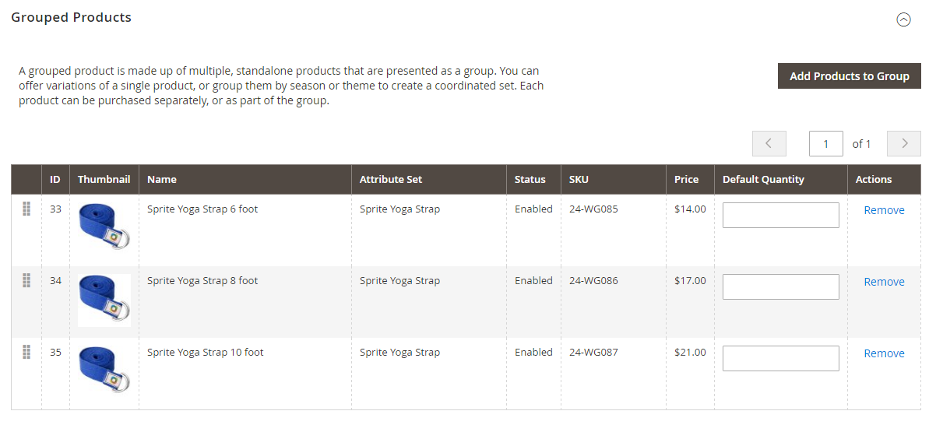
Enter the default quantity for any item.
To change the order of products, grab the Change Order icon ( ) in the first column and drag the product to a new position in the list.
To remove a product from the group, click Remove.
Just a few simple steps like that and we’re done. Right after that you can publish the product as well as set up cart thumbnails the way I instructed you above.
Note: Items will appear in your shopping cart separately.
Bundle Product
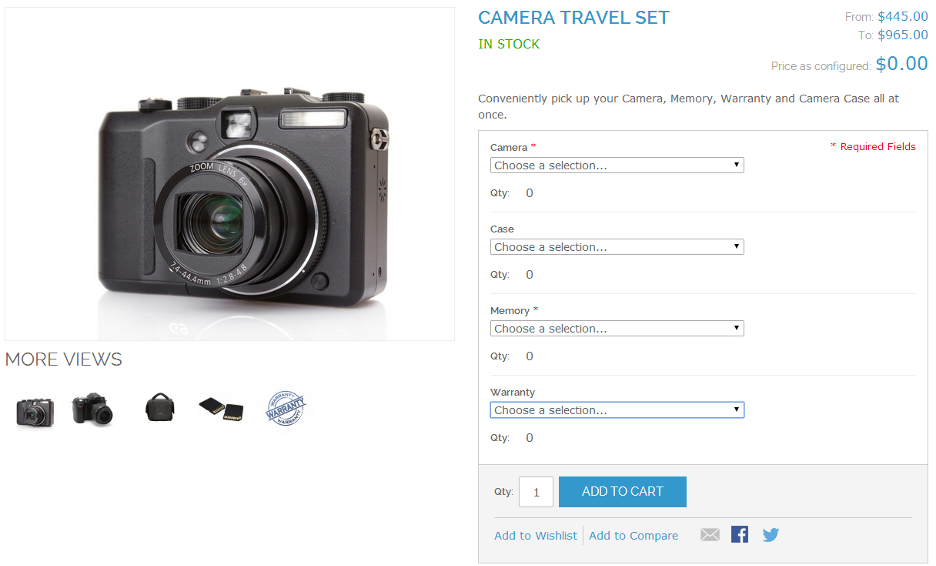
This is a product category that I love to build in my online store. Simply put, bundle products are combos created by the shop owner himself. These bundles can help customers own multiple items at once at a discounted price.
We will still go from the basic background of setting the required information and attributes of separate products. The most important operation to perform is to Add the bundle items.
To get started, scroll down to the Bundle Items section and set Ship Bundle Items and select:

- Separately
- Together (all package items must be assigned the same source)
Click More options and do the following:
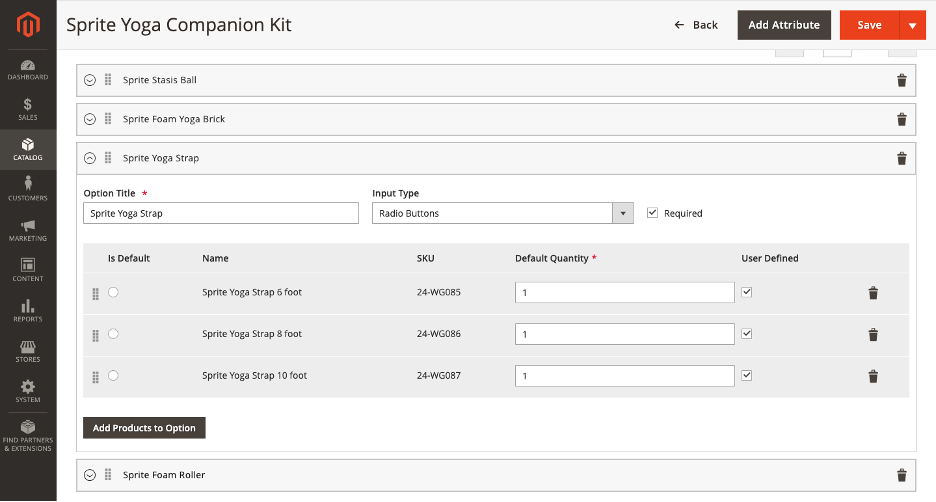
Enter Option Title to be used as the field label.

Set the Input Type to one of the following:
- Drop-down: Displays a drop-down list of options with the product name and price. Only one item can be selected.
- Radio buttons: Displays a radio button for each option, followed by the product name and price. Only one item can be selected.
- Checkbox: Displays a checkbox for each option, followed by the product name and price. Multiple items can be selected.
- Multiple Select: Displays a list of options with the product name and price. To select multiple items, hold down the Ctrl key (PC) or the Command key (Mac) and click each item.
To make this field a required entry, select the Required checkbox.
Click Add Products to Option and select the checkbox of each product that you want to include in this option. If there are multiple products, use the list filter and pagination control to find the product you need.
Click Add Selected Products.
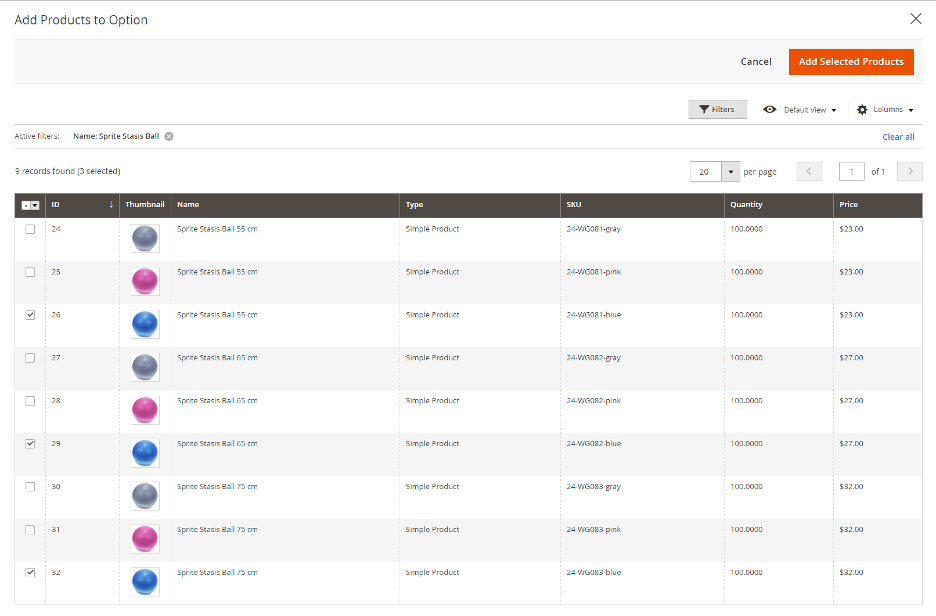
After the items appear in the Options section, select an item as the Default Selection.
In the Default Quantity column, enter the quantity of each item that will be added to the bundle when the customer selects the item.
To allow customers to change the quantity of a package, select User Defined.
By default, the Customer cannot change the Default Quantity included in a package. However, the customer can enter the quantity of the item that will be included in the package.
Repeat these steps for each item you want to add to the group.
To change the order of items in a package section, click the Move icon at the top of the row and drag the item into place.
The order of items can also be changed in the data of an exported bundle product and then re-imported into the catalog. For more information, see Import products in bundles.
Change the Order of Bundle Items
To change the order of sections in a bundled product, click the Move icon in the section’s header and drag the section to a new location. For a better view of the workspace, first, collapse each section and then drag them into place.
To remove any item from the pack, click Remove.
When done, click Save.
That’s it, you have finished adding a Bundle Product to Magento 2. And then you can publish the product and set up cart thumbnails the way I instructed you above.
Downloadable Product
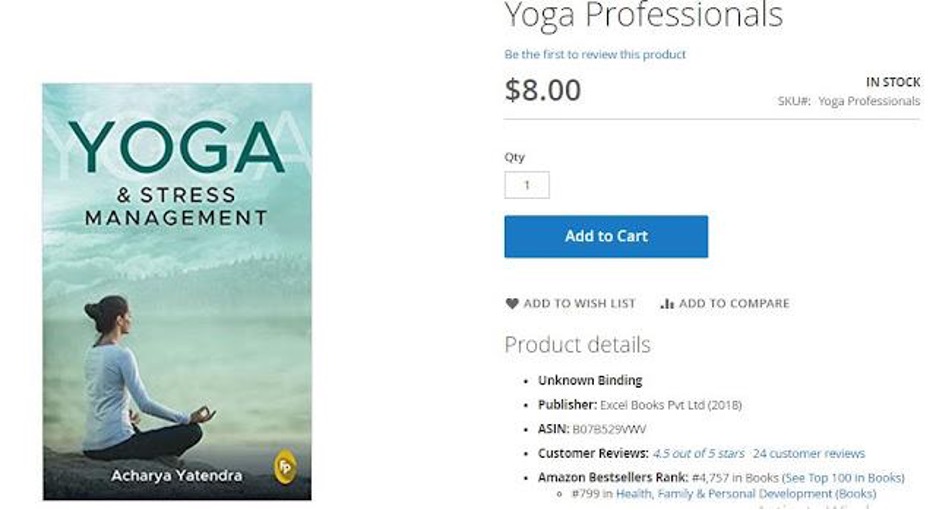
A downloadable product can be anything that you can distribute as a file, such as an e-book, music, video, software application, or update. Since the actual download isn’t available until after purchase, you can offer samples, such as excerpts from a book, a clip from an audio file, or a trailer from a video, that customers can try out first. when purchasing the product. The files that you provide for download may be uploaded to your server or from another server.
Downloadable products can be configured to require customers to log in to an account to receive a link, or can be emailed and shared with others. The status of the order before the download is available, the defaults, and other delivery options are set in the configuration.
You will still start by selecting the add object as Downloadable Product from Products on the Catalog section.
The data of this product type is set to Downloadable when you select the attribute set.
Continue to complete the required settings including Product Name, SKU, Product Price. Click Save after completing the above information.
Continue to perfect the basic settings including:
- Tax
- Quantity
Note: By default Stock Status will be set to Out of Stock.
- Visibility
- Set Product as New in case your product is new
- Categories
- Format includes 2 formats: Download and DVD
If needed, you can edit the property to add more values. The selection varies by attribute group and you can complete them later.
Specify source and quantity (Inventory management)
For Multi-Source merchants using Inventory Management, scroll down to the Source section and specify the source and quantity:
To add a source, click Assign Sources.
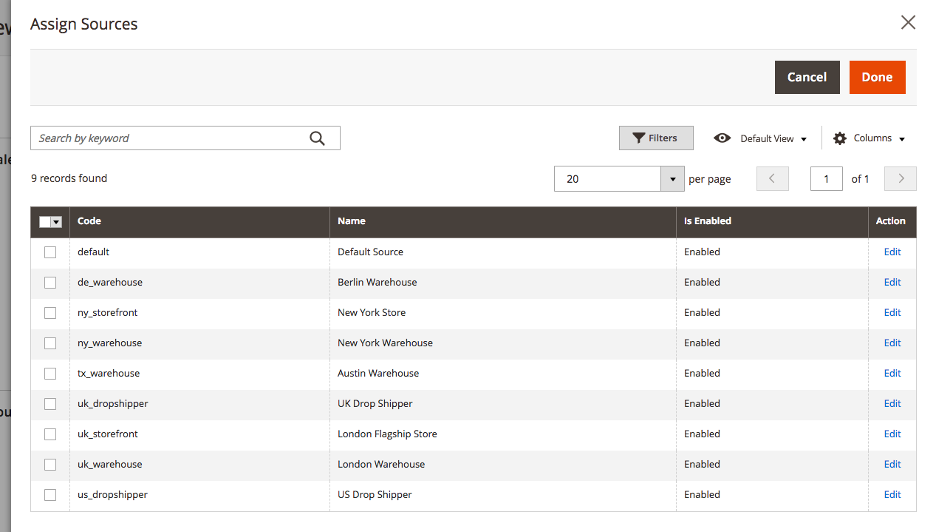
Browse or search for the source you want to add. Select the check box next to the source(s) you want to add for the product.
Click Done to add the source.
To manage the quantity and status of the source, click Advanced Inventory and set Manage Stock to Yes.
To change the setting and quantity for each specified source, do the following:
Set Source Item Status to In Stock.
Enter quantity, update Quantity for available stock.
To set notifications for inventory quantities, you have 2 ways.
- Clear the Notify Quantity Use Default checkbox and enter an amount in Notify Quantity if you want Custom Notify Quantity. Select the Notify Quantity Use Default
- Commerce checks and uses the setting in Advanced Inventory or global Store configuration if you want Default Notify Quantity.
Now comes the most important part of adding Downloadable Product on Magento 2: Complete downloadable information.
Scroll down, expand the Downloadable Information section and select Is this downloadable product? checkbox.
The Downloadable Information section has two parts. The first section describes each download link and the second describes each sample file. Defaults for many of these options can be set in the configuration.
To complete the links, enter the Title that you want to use as the title for the download links.
If possible, select the Links that can be purchased separately checkbox.
Click Add Link and do the following:
Enter the Title and Price of the download.
For both File and Template files you have 2 methods:
- File Upload – Choose this method to upload the distribution file to the server. Browse the file and select it to upload.
- URL – Choose this method to access the distribution file from a URL. Enter the full URL in the download file.
Set Shareable to one of the following options:
- No – Requires customers to log in to their account to access the download link.
- Yes – Email links that customers can share with others.
- Use Config – Use the method specified in the Downloadable Product Options configuration.
Do one of the following:
- To limit downloads per customer, enter Max. Downloads.
- To allow unlimited downloads, select the Unlimited checkbox.
- To add another link, click Add Link and repeat these steps.
Complete the forms
In the Templates section, enter the Title that you want to use as the title for the templates.
To complete the information for each template, click Add link.

Complete link details as follows:
Enter the Title of the individual template.
Choose one of the following delivery methods:
- File Upload – Choose this method to upload the distribution file to the server. Browse the file and select it to upload.
- URL – Choose this method to access the distribution file from a URL. Enter the full URL in the download file.
To add another template, click Add link and repeat these steps.
To change the order of the patterns, grab the Change Order icon ( ) and drag the pattern to a new location.
Then you can complete the information and publish the product as I instructed above.
Add Product Attribute on Magento 2
Besides adding products, Product Attribute is also one of the relevant factors that many users are interested in.
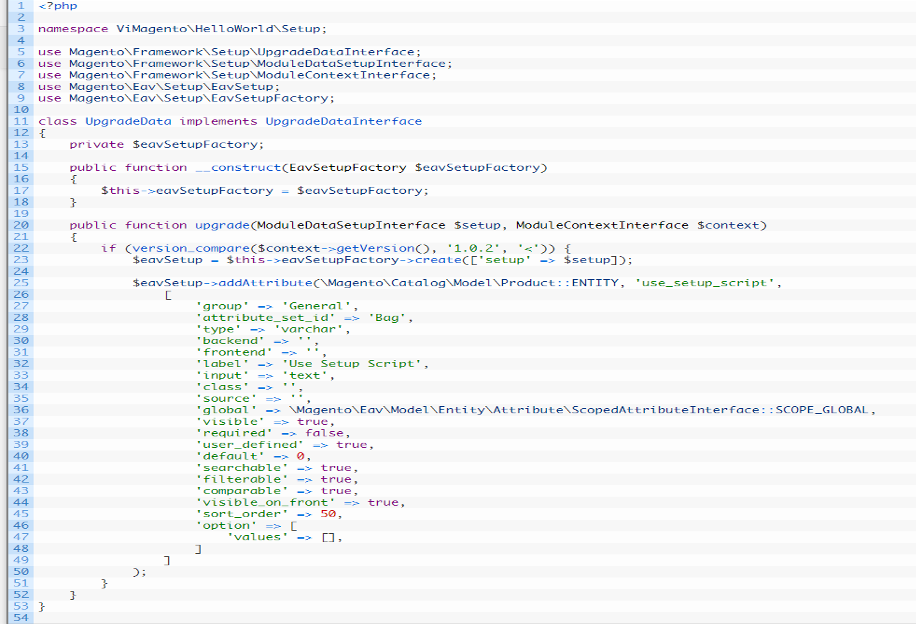
I usually do this with Setup Script.
First, you create the file ViMagento/HelloWorld/Setup/InstallData.php located in the module ViMagento_HelloWorld with the following content:
Attributes
- group: attributes are grouped into groups, this value indicates which parent group the attribute will belong to.
- Type: Specifies which table this attribute should be stored in.
- Backend: defines the class that will perform some specific action when loading or saving the attribute.
- frontend: defines how the attribute should be displayed.
- label: the value to be displayed in both frontend and backend.
- input: define input type such as select, text…
- source: list of options used for input type select, multi-select.
- global: defines the scope of the attribute global, website, or store.
- required: Specifies whether the input is required.
- visible: determines whether the attribute is visible in both the backend and the frontend.
- visible_on_front: determines whether the attribute is displayed in the “More Information” tab on the product detail page. And it also depends on the visible property above.
- default: set a default value for the attribute.
- is_used_in_grid: determines whether the attribute is used in the grid.
- is_visible_in_grid: determines whether the attribute is visible in the grid.
- is_filterable_in_grid: determines whether the attribute is filtered in the grid.
- User_defined: Specifies whether the admin has the right to delete or change the attribute.
- searchable: Specifies whether the attribute can be used to search.
- unique: whether the value is unique or not.
- option: defines the list of options used for select, multi-select.
- sort_order: the sort order of the attribute.
- apply_to: apply to any product type. For example simple product, virtual product….
Then upgrade the version of the module to 1.0.2, run the command PHP bin/Magento setup: upgrade and go to your admin page Catalog > Product > Add Product.
Conclusion
So, to add products on Magento 2, you need to be patient enough. But it’s not too difficult, right? Follow the steps that I have shown and you will have the job done in no time.
If you have any FAQs, don’t hesitate to share them with us!