PrestaShop has been a versatile open-sourced eCommerce platform that offers a range of comprehensive features built to assist merchants. PrestaShop is well-known for its high customization; however, many merchants find this platform too complicated to maintain and upgrade. That said, if you are experiencing the same ache, you’re not alone. Shopify, on the other hand, is an alternative that directly rivals PrestaShop with its all-in-one cloud-based solutions. Wonder what sets this platform apart?
The most significant difference between the two platforms lies in how they’re deployed and managed:
- PrestaShop requires manual handling in most essential management tasks such as hosting setup, security configuration, domain pointing, SSL certificates, backups,,…you name it. Besides, maintenance and upgrading are no tasks for non-tech users.
- Shopify streamlines everything. It’s fully hosted, includes security, and offers centralized control via a clean admin dashboard. You focus on selling; Shopify handles the rest.
In this article, our expert from Next-Cart will explain:
- The difference in data structure between PrestaShop and Shopify, which is a crucial for a successful migration.
- How to migrate your store (products, customers, orders,…) using our comprehensive migration tool.
- How to inspect and optimize your Shopify store after the migration.
Now! Let’s get started.
- Key difference in data structure
- Migrate from PrestaShop to Shopify with Next-Cart
- Post-migration adjustment and optimization
- 1. Verify and organize your data
- 2. Configure Shopify’s core features for the first time
- 3. Test and optimize the new store
- Conclusion
Key difference in data structure
Products
Both platforms support Simple and Variable products, though they use different labels (Shopify: Simple and Variant; PrestaShop: Standard and Product with Combinations). PrestaShop also allows Grouped Products or Packs of Product, which Shopify doesn’t support natively. If you have bundles or packs when migrating to Shopify, you’ll need an app to replicate that setup.
Discounts are another difference I see come up often. PrestaShop lets you create advanced discount rules by quantity and limited periods. Shopify’s discounting is much more basic. You’ll need to manually adjust prices and input the original price using the Compare-at price field to show discounts.
Categories
This part trips up a lot of store owners. Almost all eCommerce platforms support hierarchical categories, or Category tree. PrestaShop is one of them. The platform uses a category tree (parent > subcategory > sub-subcategory). Shopify doesn’t. All categories are flat. To recreate that structure, you need to use nested navigation menus. We have an article to instruct on building a multi-level category menu in Shopify here: Multi-level Menus for Categories on Shopify.
The good news? Our tool automatically converts your PrestaShop category tree into a nested menu structure on Shopify. You won’t need to rebuild it from scratch.
Customers
In PrestaShop, you can group customers and assign specific discount levels. In Shopify, it’s handled with segments, which are more flexible but work differently. During migration, we store your PrestaShop customer groups based on the basic attributes as metafields, so you can build segments on Shopify that match your old logic, and apply the discount strategies for each segment created.
Order statuses
This is where the platforms really differ.
- PrestaShop uses one field for order status like “Shipped”, or “Awaiting payment” to indicate the status of the order.
- Shopify splits this into payment status (“Pending”, “Paid”, “Refunded”) and fulfillment status (“Unfulfilled”, “Restocked”, “Fulfilled”), which makes tracking easier but also means you need to map statuses carefully.
We’ve built a mapping system into the migration tool so you can define how each PrestaShop status translates into Shopify’s structure. Done right, this keeps your order history intact and avoids confusion.
SEO and URLs
Both PrestaShop and Shopify support essential SEO fields like meta title, meta description, and tags. But when it comes to URL management, there’s a clear difference; and it’s something we deal with in nearly every migration.
PrestaShop gives you full control over how URLs are structured. You can customize the overall format and assign friendly URLs to individual products and categories without any platform-imposed prefixes.
Shopify is more restrictive. While you can still assign custom slugs (the part after the slash) to products and categories, the base structure is locked in:
- Product URLs always start with
/products/ - Collection (category) URLs always start with
/collections/
That means you won’t be able to replicate your exact PrestaShop URLs on Shopify. For store owners with a long SEO history, this limitation can be frustrating.
But this is no closed door. Shopify provides a built-in URL redirect system. During the migration, our tool automatically sets up 301 redirects from your old PrestaShop URLs to their new Shopify counterparts. These redirects ensure your site retains its search engine rankings and that returning visitors (and backlinks) don’t hit dead ends.
After the migration, you can view and manage all these redirects directly in the Shopify admin panel. It’s not as flexible as PrestaShop, but it’s effective; and it works. We’ve used this process successfully across hundreds of migrations with zero SEO penalties.
Migrate from PrestaShop to Shopify with Next-Cart
At Next-Cart, we’ve simplified the migration process so that even store owners with no technical background can move their data from PrestaShop to Shopify with confidence. Our migration tool is designed to handle complex data structures while giving you full control over what gets moved and how.
The entire process takes just three clear steps. Here’s exactly how it works:
Step 1: Set up connection
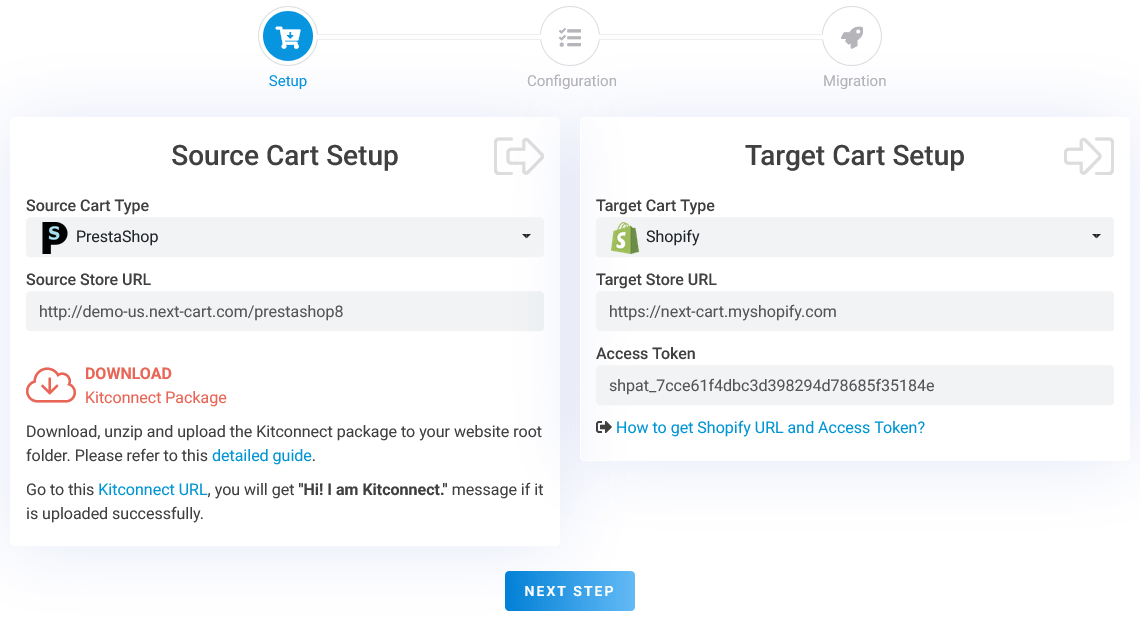
PrestaShop to Shopify – Setup Connection
Before starting the migration, you’ll need to connect both your source (PrestaShop) and target (Shopify) stores to the migration tool.
- PrestaShop Store: Download the KitConnect package directly from the tool and upload it to the root directory of your PrestaShop website using FTP or cPanel. This enables the tool to securely access your store data.
- Shopify Store: Log into your Shopify admin and generate a Private App Access Token (or Admin API token). Paste this token into the migration tool to authorize access.
Once both stores are connected and verified, click “Next Step” to move on to the configuration phase.
Step 2: Configure migration
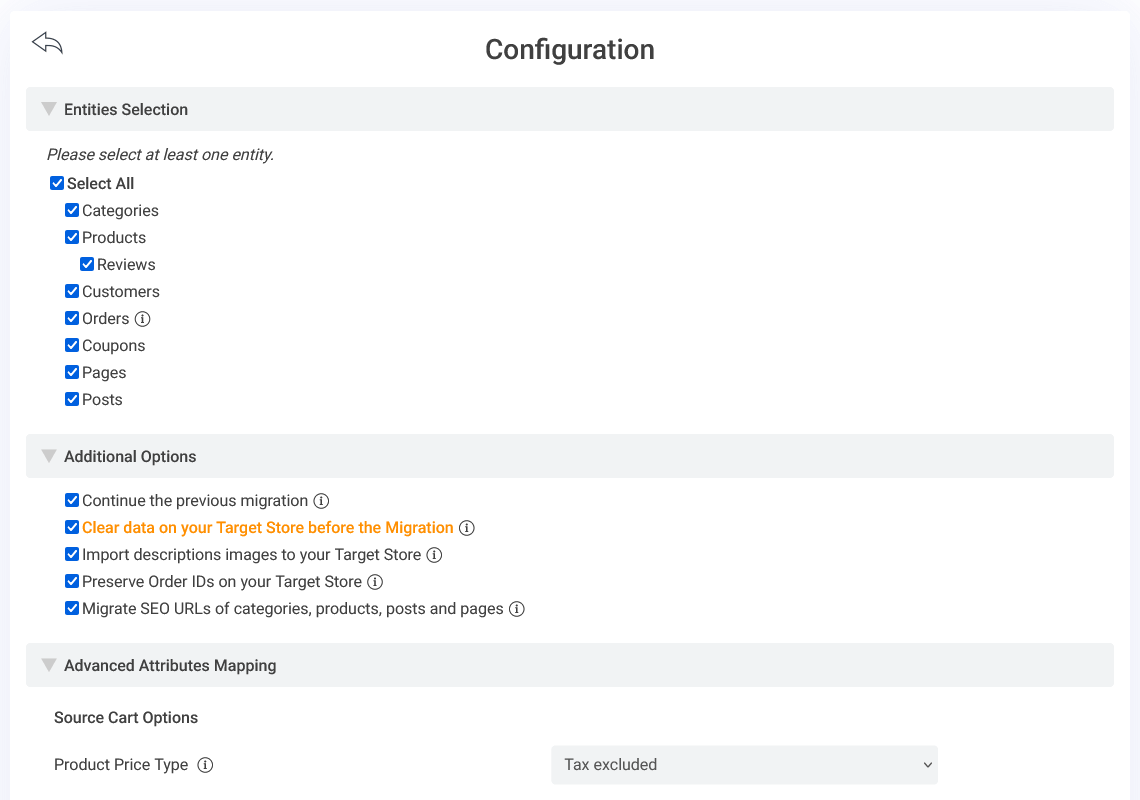
PrestaShop to Shopify – Configuration
This stage is where you define what data you want to migrate and how you want it handled. Every decision you make here helps tailor the migration to fit your exact business needs.
Select entities to migrate
Choose the data types you want to transfer. Supported entities include:
- Products
- Categories (Collections)
- Customers
- Orders
- Coupons
- Reviews
- And more
Additional options
These options allow for deeper customization. Here’s how we typically guide clients through each one:
- Continue the previous migration: If you’ve run an initial migration already (for testing or staging), this option allows you to migrate only the newly added or updated data without duplicating existing records.
- Clear data on your Target store: This wipes selected data types from your Shopify store before importing new ones from the PrestaShop Store. The migration tool only delete the data you choose at “Select Entity.” It’s useful if you’re resetting a test store or want a clean slate. But use it carefully, as the deletion is permanent.
- Import description images: By default, images and image addresses inside product descriptions are hotlinked from your PrestaShop store. Enabling this option uploads those images to Shopify’s servers and updates the image URLs in the descriptions accordingly.
- Preserve order IDs: Shopify generates its own order IDs, but with this option, the tool will retain the original PrestaShop order numbers on the new store. This helps maintain continuity, especially if you’re using external accounting or ERP systems.
- Migrate SEO URLs: This option sets up 301 redirects from your old PrestaShop URLs to the new Shopify URLs. In case buyers browse the old links, they will be redirected to the new links without further ado. It’s essential for preserving SEO equity and ensuring that existing backlinks and search engine rankings are intact.
Advanced data mapping
There are a couple of technical details to fine-tune here, depending on your store data:
- Tax configuration for products: Specify whether your product prices in PrestaShop include tax or are tax-exclusive.
- Order status mapping: PrestaShop uses a single status field, while Shopify separates status into payment and fulfillment. You’ll need to map each PrestaShop order status to a combination of these two fields. This step is critical to ensure that your historical order data remains accurate and meaningful in Shopify.
Step 3: Start the migration
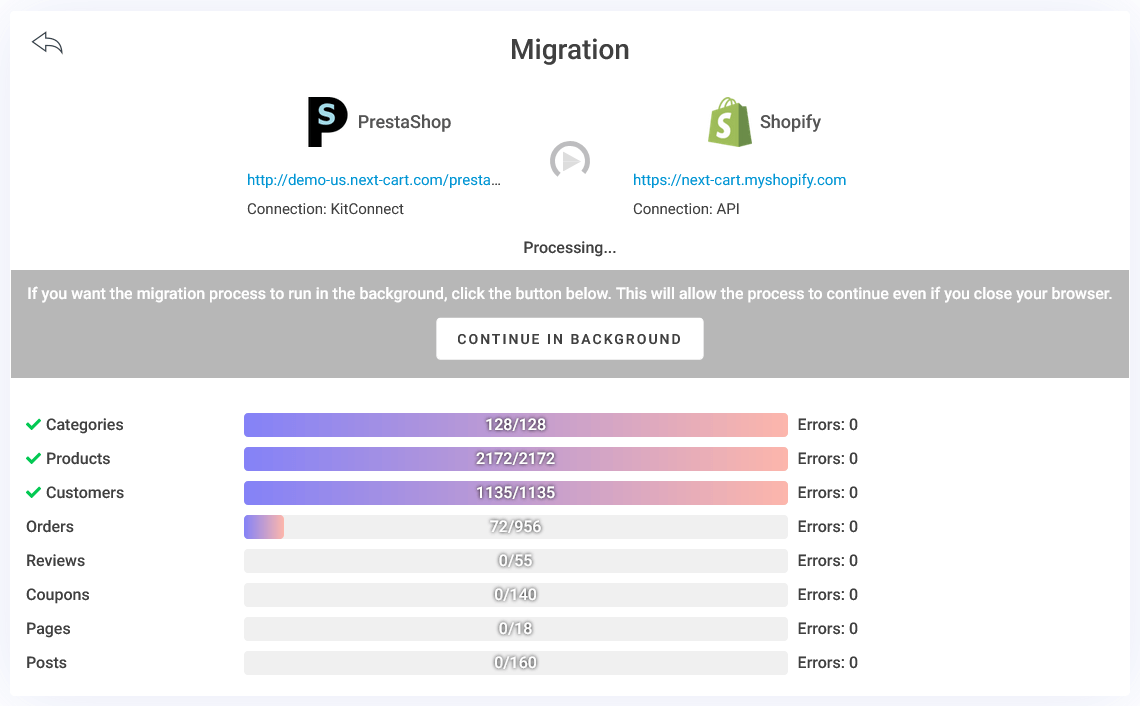
PrestaShop to Shopify – Migration Process
Once your configuration is complete, click “Next Step” to launch the migration process.
The duration of the migration depends on the volume of your store data and the options you’ve selected; it can take anywhere from a few minutes to several hours.
- If you’re migrating a small set of data, you can keep the process running directly in your browser and monitor it in real time.
- For larger stores, we recommend letting the process run in the background on the cloud. You won’t need to keep your computer on or your browser open because the migration will continue securely on our servers.
You can return to the migration tool at any time to check the status. Once you see the message “The previous migration has been finished!”, it means your data has been fully transferred and the migration is complete.
Watch this demo video for a clear walkthrough of all three migration steps:
Post-migration adjustment and optimization
Once your store data has been fully imported into Shopify, your job isn’t done just yet. Before launch, it’s critical to review, fine-tune, and configure key features to ensure everything runs smoothly from day one.
Based on our experience supporting thousands of successful migrations, here’s what you should focus on next:
1. Verify and organize your data
- Products and categories: Start with reviewing your product data. Check for image quality, attribute accuracy, and product variants. Make sure each product is properly assigned to its corresponding collection (category).
- Category structure: Remember, Shopify uses a flat category system. If your PrestaShop store uses a hierarchical category tree, make sure that you create the nested navigation menu structure properly and it should be functioning as expected.
- Customers and orders: Review your customer records to ensure details such as names, emails, and addresses are transferred correctly. For orders, verify that each one is properly linked to the right customer, and that order values, item properties, and order statuses are all accurate. Pay special attention to payment and fulfillment statuses, as they are structured differently in Shopify.
- URL Redirects: Navigate to Shopify Admin > Content > Menus > URL Redirects to check your redirect paths. If all old URLs from your PrestaShop store are correctly redirected to the new Shopify URLs, your SEO value and user access paths will remain intact after domain switching.
2. Configure Shopify’s core features for the first time
- Multi-language setup: If your store supports multiple languages, set up Shopify Markets to define regions and languages. -> See full setup guide here.
- Shopify POS integration: For merchants with physical retail operations, consider replacing your legacy POS with Shopify POS. It simplifies inventory syncing, order tracking, and reporting across all sales channels.
- Theme and design setup: Choose a Shopify theme that matches your brand identity. You can find free and paid themes in the Shopify Theme Store, or work with a developer for a fully custom design.
- Payment gateway configuration: Enable Shopify Payments if your country supports it. For broader payment flexibility, connect third-party providers like Stripe, PayPal, or Authorize.Net to serve more customer preferences.
- Shipping and tax settings: Configure shipping zones and define tax rules based on your business’s operational regions. Double-check tax display and calculation accuracy at checkout.
- Email notifications: Set up notifications through email to keep good eyes on your store’s activities. Make sure the store manager and customers always receive important information like account creation, order confirmation, shipping updates, or sales events.
3. Test and optimize the new store
- Full store audit: Do these 2 things. Conduct a final walkthrough of your store’s SEO structure (meta tags, URLs, page titles) and test the customer journey, from homepage to checkout. Don’t go live until you’re confident every step works perfectly.
- Performance optimization: If you expect high daily traffic to your store daily, consider implementing performance tools such as Caching plugins or integrating a Content Delivery Network (CDN). These reduce load times and improve responsiveness.
- Analytics and tracking: Don’t forget to connect your site to Google Analytics and Google Search Console. These tools will alert you to broken links, crawling errors, or traffic issues. They also provide insights into customer behavior, product trends, and overall site performance.
Conclusion
At the end, our experience has been telling us that migrating from PrestaShop to Shopify is more than a technical transition; it’s a strategic move toward scalability, stability, and operational efficiency.
At Next-Cart, we’ve helped countless merchants go through this process smoothly and successfully. We’ve seen firsthand how the right migration not only preserves a business but positions it for faster growth. Whether you’re managing a lean team or a complex retail operation, moving to Shopify means less time fixing problems and more time focused on growth.
Our job is to make sure your data moves cleanly, your store stays intact, and your business doesn’t miss a beat. If you’re ready to simplify your platform and upgrade your capabilities, we’re here to help.
Let us know how we can support your next step.