Shopify dominates the world of cloud-based eCommerce platforms, while WooCommerce leads the way among self-hosted solutions. Both platforms boast large user communities, extensive app marketplaces, and exceptional scalability. In many ways, Shopify matches WooCommerce feature for feature. However, like all cloud-based platforms, Shopify has an inherent limitation: no matter how flexible it is, its customization options are ultimately restricted by the hosting infrastructure, which users have no control over. This is precisely why self-hosted platforms like WooCommerce exist – to give users full control over their server environment, allowing them to modify and customize their store in any way they see fit.
There are two main reasons why merchants choose to migrate from Shopify to WooCommerce: greater customization and cost savings. While WooCommerce offers most of the essential features merchants need, it often requires additional customization to match the functionality available on Shopify. In this blog, we’ll take an in-depth look at the key data structure differences between Shopify and WooCommerce and outline the essential steps for a smooth migration using Next-Cart’s Shopify to WooCommerce migration tool and services.
Understanding the Differences in Data Structure
Products
Shopify limits each product to 3 options and up to 2,000 variants. For example, a t-shirt can have options like size, color, and material, but it cannot exceed 2,000 variant combinations. WooCommerce, on the other hand, allows unlimited product attributes and variations, making it ideal for stores with complex product configurations.
Shopify also manages downloadable products through third-party apps, while WooCommerce natively supports digital downloads with options for secure file delivery and multiple file types.
Categories vs. Collections
- Shopify: Organizes products into flat “collections”, which can be either manual or automated.
- WooCommerce: Uses a hierarchical structure with categories and subcategories, offering a more organized approach for large inventories.
Key Challenge: Migrating from collections to categories requires mapping these relationships accurately to preserve your store’s navigation.
Customers
- Shopify: Allows customers to save multiple addresses and additional profile details.
- WooCommerce: Restricts customers to one billing and one shipping address per account.
Key Challenge: During migration, only the default address will be transferred to WooCommerce. Any additional addresses may not be included.
Orders
- Shopify: separates order statuses into payment and fulfillment stages (e.g., Paid and Unfulfilled).
- WooCommerce: consolidates these into a single status field, such as Processing or Completed.
Migration Tip: Mapping these statuses accurately is critical to maintaining order history consistency.
Blog Posts
Shopify supports basic blogging functionality, while WooCommerce, powered by WordPress, provides an advanced blogging platform. Most of blog post data can be migrated from Shopify to WooCommerce, including titles, content, metadata, categories, tags, SEO URLs, and featured images. However, metafields may not be transferred, as WooCommerce does not support this feature on blog posts.
SEO and URLs
Shopify automatically generates URLs with prefixes like /products/ and /collections/. WooCommerce offers greater customization via permalinks, enabling you to structure URLs without additional prefixes. Migrating SEO settings ensures you retain search engine rankings and avoid broken links.
Migrating from Shopify to WooCommerce with Next-Cart
Switching from Shopify to WooCommerce might seem daunting, but with Next-Cart’s migration tool, the process becomes simple and hassle-free. Our tool is designed to handle everything from products and orders to blog posts and SEO settings. Here’s how you can migrate your store in three easy steps:
1. Set up the connection
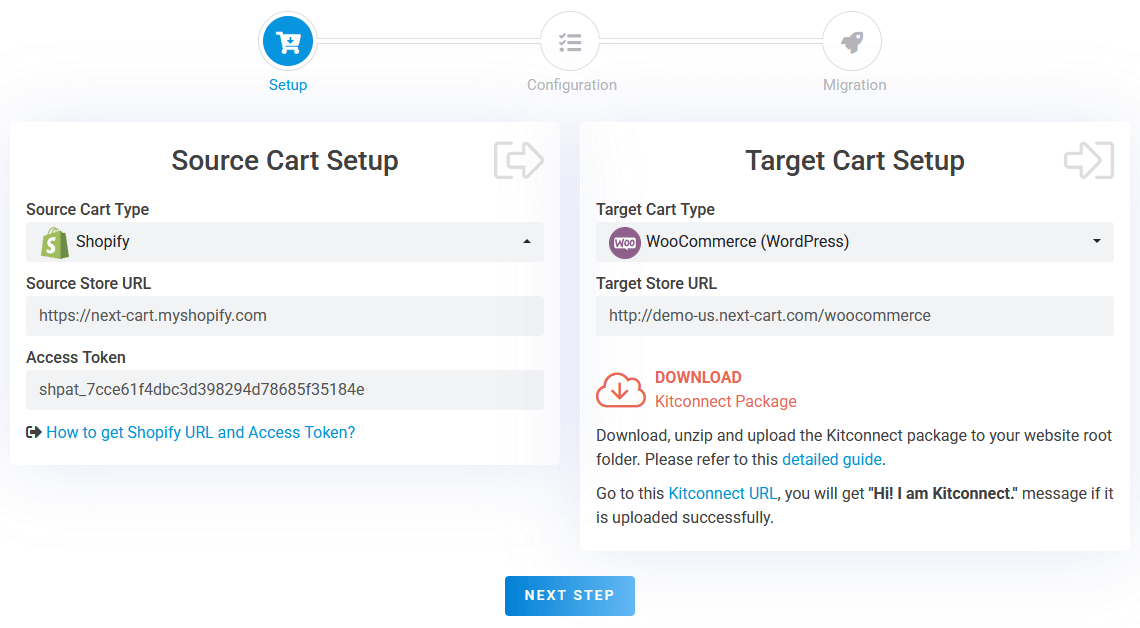
Shopify to WooCommerce – Setup Connection
In the first step, you need to set up connections between your Shopify store and your WooCommerce store and our migration tool:
- Source Store (Shopify): Generate a custom app from your Shopify admin panel and input its Access Token into the Next-Cart migration tool.
- Target Store (WooCommerce): Download the kitconnect package from the migration tool and upload it to your WooCommerce directory via cPanel or FTP.
Once you have provided all the necessary information, click “Next Step” to proceed to the migration configuration step.
2. Configure the migration
In the Configuration step, you can customize your migration process using the following three sections:
Entities Selection
In the first section, you can select the data types you wish to migrate, including:
- Products
- Categories
- Reviews
- Customers
- Orders
- Coupons
- Blog Posts
- CMS Pages
Additional Options
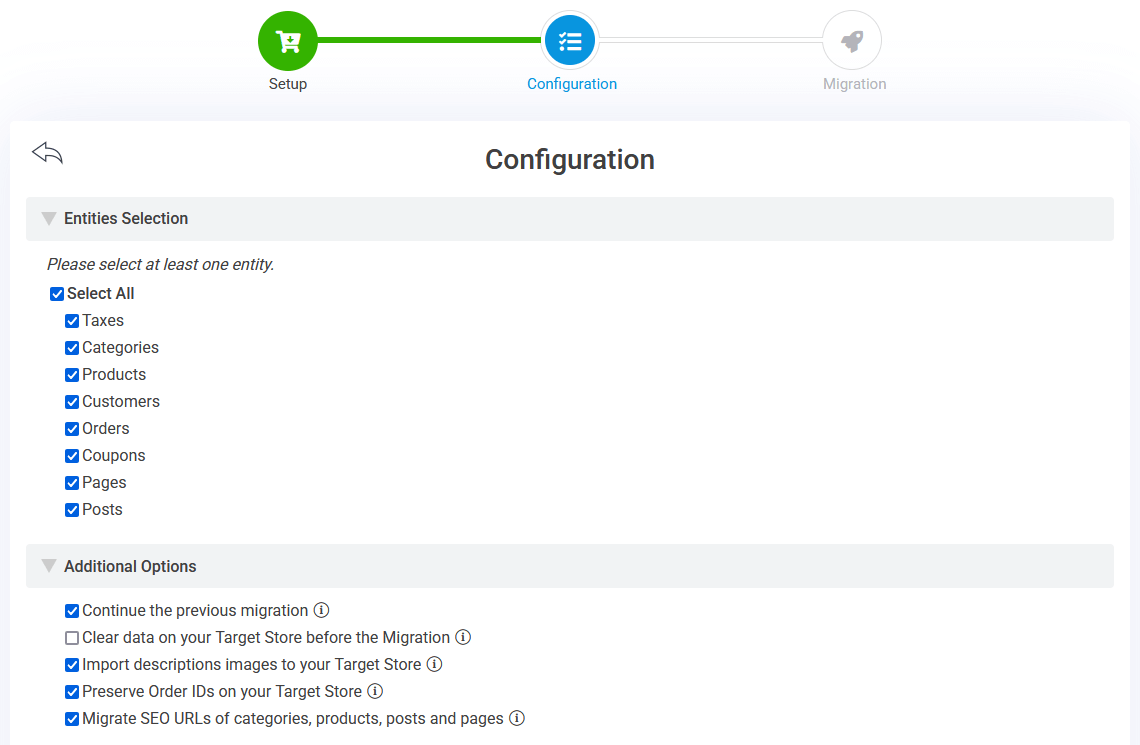
Shopify to WooCommerce – Entities Selection and Additional Options
In the second section, you can customize your migration with these key options:
- Continue the previous migration: If you’ve already completed a migration, this feature allows you to transfer new data (such as recently added customers or orders) since the last migration, ensuring your WooCommerce store stays up-to-date.
- Preserve Order IDs: This option ensures that the original Shopify order numbers are retained, making order management on your new WooCommerce store more seamless and organized.
- Migrate SEO URLs: Essential for maintaining your site’s SEO performance, this option transfers your Shopify URLs into WooCommerce’s redirect system. It keeps your old URLs active after moving your domain to WooCommerce, preventing broken links and preserving link equity.
Advanced Attributes Mapping
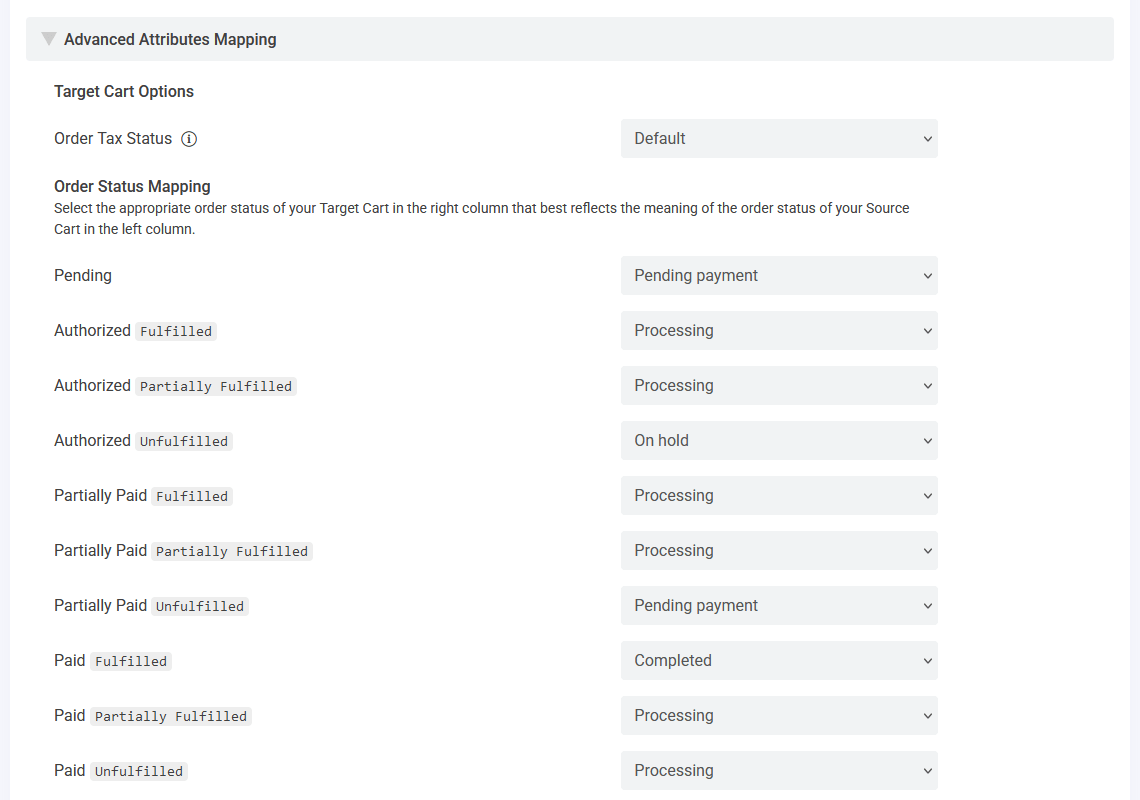
Shopify to WooCommerce – Attributes Mapping
In the last section, you need to map Shopify’s two-stage order statuses (payment and fulfillment) into WooCommerce’s single-order status field.
There’s no standard correlation between Shopify and WooCommerce order statuses. The mapping depends entirely on how you categorize and manage orders in your Shopify store. Consider how these statuses align with your WooCommerce workflow to maintain consistency.
If your Shopify store is multilingual, this is also where you can map the language settings between the two websites. Of course, you’ll need to install a multilingual plugin for your WooCommerce store before doing this. WPML and Polylang are the two most popular multilingual plugins, and both are natively supported by our migration tool.
3. Start the migration
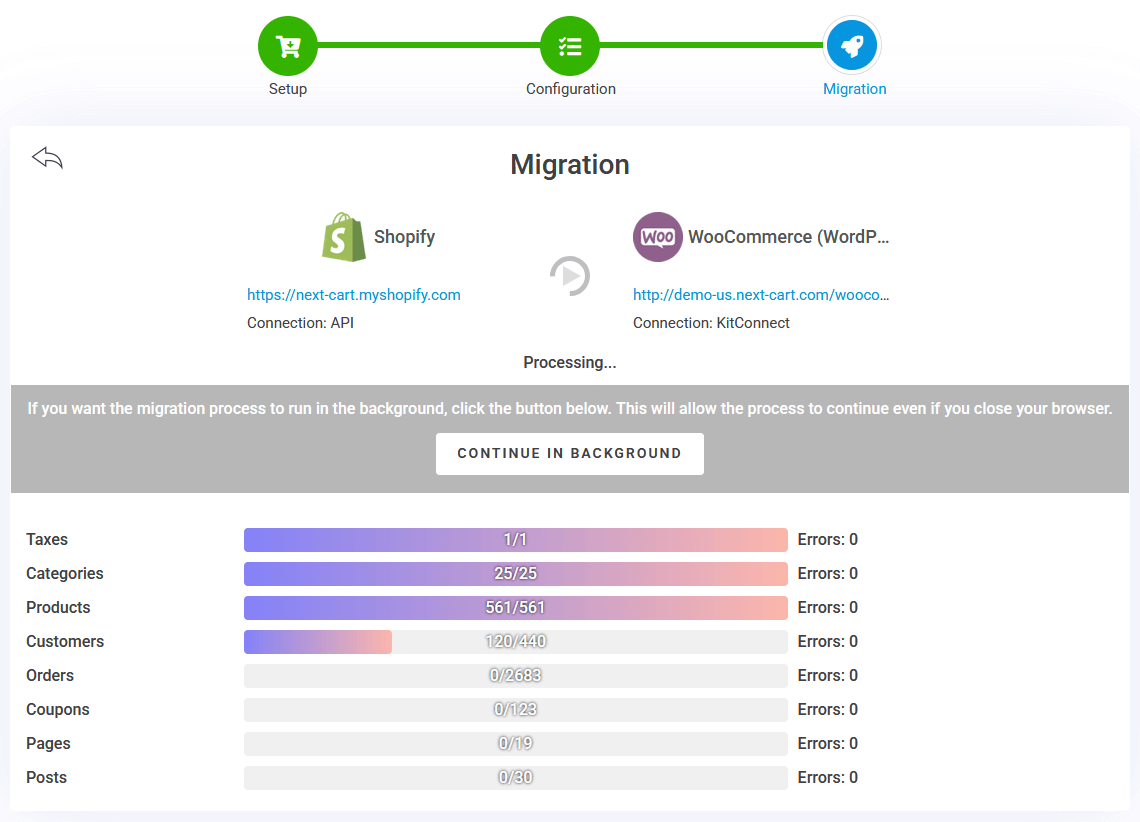
Shopify to WooCommerce – Migration Process
Click “Next Step” to begin the migration. Depending on the size of your store and the speed of your server, the process may take anywhere from a few minutes to several hours. You can monitor progress or move it to the background and review results once the migration is complete.
Post-Migration Adjustments
Migrating your data from Shopify to WooCommerce is only part of the journey. To ensure your WooCommerce store is fully functional and optimized for success, some post-migration adjustments are necessary. Here’s how to finalize your transition effectively:
1. Set up WooCommerce features
WooCommerce offers an array of features that may not be configured immediately after migration. Spend time setting up the following:
- Payment Gateways: Enable payment gateways like PayPal, Stripe, or WooCommerce Payments to handle transactions. Test each gateway to ensure a smooth checkout experience for customers.
- Shipping Methods: Define your shipping zones, methods (e.g., flat rate, free shipping), and integrations with shipping carriers like USPS, UPS, or DHL.
- Email Notifications: Customize email templates for order confirmations, shipping updates, and customer inquiries to maintain professional communication.
2. Design and customize your store
WooCommerce provides unparalleled flexibility for store design. Use this opportunity to create a user-friendly and visually appealing shopping experience:
- Choose a Theme: Select a WooCommerce-compatible theme that matches your brand’s aesthetic. Themes like Astra, Storefront, or Flatsome are excellent starting points.
- Customize Layouts: Leverage page builders like Elementor or Gutenberg to design custom pages, including the homepage, product pages, and checkout flow.
- Enhance Functionality with Plugins: WooCommerce has a rich ecosystem of plugins to extend functionality. Consider plugins for advanced SEO, email marketing, or product filtering to enhance customer experience.
3. Test and optimize your store
Before launching your WooCommerce store, comprehensive testing ensures a seamless experience for customers:
- Verify Data Integrity: Double-check that all products, categories, customers, orders, and other data have been accurately migrated. Look for missing images, incorrect prices, or mismatched customer details.
- Run Test Transactions: Place test orders to confirm that payments, shipping, and email notifications work as expected. Simulate various scenarios, such as guest checkouts or applying discount codes.
- Optimize for Speed: WooCommerce’s performance depends on your hosting and optimizations. Use caching plugins like WP Rocket, optimize images, and implement a CDN to improve page load times.
- Check Mobile Responsiveness: With most customers shopping on mobile devices, ensure your store looks and functions perfectly across all screen sizes.
By following these three steps, you can refine your WooCommerce store and create a seamless shopping experience for your customers. With careful adjustments, your store will not only replicate the functionality of your previous Shopify site but also take full advantage of WooCommerce’s flexibility and features.
Video Tutorial
This video tutorial will help you better understand the data migration process.
Final Thoughts
Migrating from Shopify to WooCommerce provides a unique opportunity to customize your store, reduce long-term costs, and gain full ownership of your data. With Next-Cart’s migration tool, the transition is straightforward, efficient, and tailored to your needs. Our tool preserves critical connections between products, customers, and orders, ensuring that your WooCommerce store functions seamlessly from day one.
Ready to make the switch? Explore Next-Cart’s Shopify to WooCommerce Migration Service and unlock the potential of WooCommerce for your online business!